Making Printed Circuit Boards (PCBs)

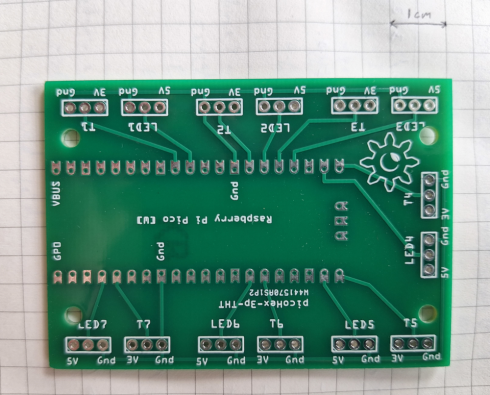
It turns out that it’s pretty easy (and relatively cheap) to design and order printed circuit boards (PCBs).

PCB wired up to a light box.

I’ve used Fritzing to design them. It’s simple to use with their PCB view window. They have a lot of parts available (such as the 3pin connectors), though I did have to get the fritzing part for the Raspberry Pi Pico off the Raspberry Pi website. Fritzing is very commonly used for circuit diagrams on the web, so it’s fairly easy to find parts you’re looking for. The current version (>1.0) requires a small donation, but the older version (0.9+) is free, and I’ve used both successfully.

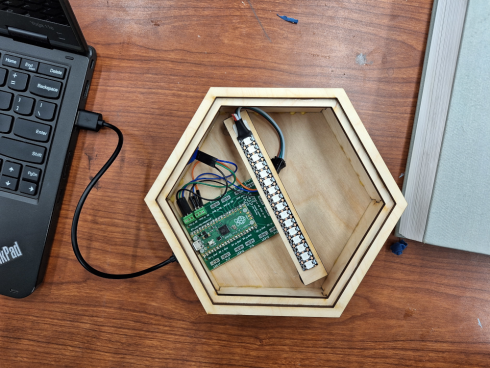
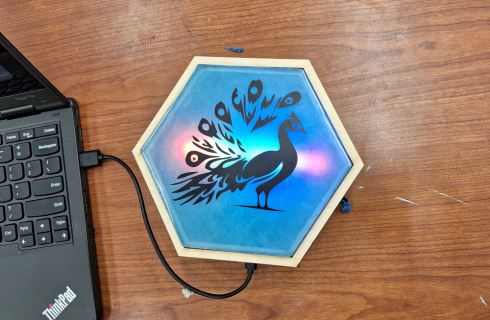
The board above is used to connect a Raspberry Pi Pico to pairs of LEDs and touch sensors. In this case only one pair is in use to make a light box that can be turned on and off by touching the sides.

Light box in action.

There are a number of companies that will take the exported Gerber files and make you a PCB. In fact, there’s even an option within Fritzing to place an order. I’ve used PCBWay (this is my PCBWay referrer link that gets me a discount if you use it), which, as of this writing, costs about $5 for a batch of 5 PCBs (that’s the minimum order), plus about $10 for 15 day shipping to the US. The only change I made to their standard settings is to use the Lead-free solder.

Image of PCB.
One of my first PCBs. It makes it easier to connect a Raspberry Pi Pico to a series of touch sensor and LED pairs. I messed this one up by not using the official raspberrypi.com part and not realizing that the one I chose did not have the holes drilled all the way through the board.

I’d like to have my physics and/or computer science students design and make their own starting next year.

3d Printing at School

The  RepRap 3D printer.
The RepRap 3D printer.

One of the key ideas behind the design of the RepRap 3D printer we just built is that you should be able to print as many of the components as possible. So you can use your 3D printer to build other 3D printers. As a consequence, the printer does not come as a nice little box. It looks a bit jury-rigged. Multicolored coils of wire snake everywhere; circuit boards and integrated chips are exposed; nuts, bolts and stainless steel rods are accessible for easy adjustment; and the plastic–printed–components are still rough from the printer. It is all function, no aesthetics. All of which make it a wonderful teaching tool.

The three students who built it got a crash course in robotic assembly. They learnt how to wire a power source, strip and solder wires, and construct the motor-controlled bed and extruder. They also learned how to use constructive solid geometry (using OpenSCAD) to create 3d shapes–I required them to design and print their own models before I would let them download object files from the internet.

On the down side, though they did have to plug a RAMPS motor shield, stepper-driver chips, and connecting wires into the Arduino microcontroller, we did not have much time to go into the detail of what it all was about. Also, we only edited an existing configuration file when we tried to calibrate the machine, so they did not learn how the programming works. Having to use the Arduino did inspire me to get one, and I was quite impressed with their starter kit, so I’m working on a “Microcontrollers for Beginners” type class or elective that I can offer over the next school year.

Arduino for Beginners

Arduino UNO connected to a breadboard from the starter kit.

I’ve been avoiding working with the Arduino microcontrollers because I’d prefer to be able to program in Python with the Raspberry Pi (for example). However, since the 3d printer we just built this summer uses an Arduino for a brain, I broke down and picked up the Arduino Starter Kit (via Adafruit).

The Arduino Projects Book is an excellent resource for the beginner.

What I liked most about the Starter Kit most is the Arduino Projects Book that comes with it. It’s a wonderful introduction to circuits, electronics, circuit diagrams, and microcontrollers at the beginners level. If I offer an Arduino elective, I’ll use it as a textbook. Indeed, I’ll probably use bits of it as a reference when I teach circuits in middle school and Advanced Physics.

As for the programming, the basics, at least, are pretty straightforward. I got a blinking LED controlled by a switch input up an running pretty quickly. The code requires two loops, one to set up the inputs and the output, and a loop for the program to follow. The code below has a blinking light that’s controlled via pin 4, but changes to a solid light when the switch is pressed (the input for the switch is pin 2). The wiring for the circuit is shown in the picture at the top of the page.

blink_circuit

int switchOn = 0;

void setup(){
  pinMode(2, INPUT);
  pinMode(4, OUTPUT);
}

void loop(){
  switchOn = digitalRead(2);
  
  if (switchOn == HIGH) {
    digitalWrite(4, HIGH);
  } else {
    digitalWrite(4, LOW);
    delay(500);
    digitalWrite(4, HIGH);
    delay(200); 
  }
  
}

Building a 3d Printer

Building the printer.

I took three students to a workshop were we’re building a 3d printer. It’s run out of the Whitfield School. We spend today putting together the electronics to run the five motors we need to get the thing to work, and starting to put the frame together.

The frame is based on the RepRap Prusa i3 (via DIY Tech Shop), and the plastic parts that hold the rods, electronics and other metal bits together are 3d printed themselves.

Students learn to solder.

The motors is run by an Arduino, which is great because I’ve been thinking about using one to operate the doors to the chicken coops.

Notes on hardware

Microcontroller

  • Arduino Mega 2560 R3
  • RAMPS Shield 1.4
  • RepRap StepStick Pololu A4988 (I think) stepper driver (plus heat sinks)

Filament: 1.75 mm PLA

Segway lessons

From playing with robots we tried an actual application of robotics. We had the Segways 101 course at the St. Louis Science Center.

The lesson itself was fun, with an entertaining video of people falling off Segways. They also had a little obstacle course to let you try doing all of the things the video told you not to do (but most of it was for the more advanced class).

Afterward, we discussed the fact that this too was robotics and a pretty advanced application at that. We did not talk much about how the Segways were supposed to revolutionize urban transportation but students did recognize the fact that aesthetics were a major impediment to their broader adoption.

The price was a bit steep however, and I’m a little conflicted about if it was worth it.

Lego Mindstorms

I’ve been curious about the Lego Mindstorms robotic systems for a while now, and I had my first chance to try them at the St. Louis Science Center.

The kits come with a micro-controller, a few motors and some sensors. While there are quite a number of ways of assembling these to make robots, the ones at the science center were pre-built except that you could just plug in a bulldozer or sweeper attachment (and a head which was purely decorative). This limited the degrees of freedom to three, which made it easier to program something useful in the hour we had with the robots.

The programming is very basic. There are two sets of instructions, one to control the movement of the robot in general, and one to control its response when the sensor detected a change in the environment. The objective of the science center’s game was to clear off a set of objects from a white rectangle within five minutes.

You could tell the robot to move forward, back or rotate while it’s on the board and to activate its sweeper or shovel. So a full program could have just five elements; general: lower shovel –> move forward –> rotate; sensor: move backward –> rotate. With these strict limitations, the programming interface is also very simple; you plug in blocks with each instruction in the series for either the general movement or the sensor reaction. With all this simplification, I’m not sure just how much the students learned about programming from our short session.

The full kit from Lego offers more freedom to design robots and thus more flexibility with the programming interface so with a little thought it could be easily integrated into the curriculum. At about $300 each the system is a bit pricy, we’d probably need to get one kit for each small group of 3-4 kids. They would probably be worth it however if we used them more than just once.

I’ve been playing with the Basic Stamp micro-controller for a while, and while it offers almost infinite flexibility, making it more useful for practical applications, it does not provide the immediate gratification of the robots, and the ease of assembly to make it the better tool for introducing robotics to middle schoolers. I still, however, tend to favor practical applications, so perhaps I can persuade a student to do an advanced project to build an automatic window for the greenhouse.

The session at the Science Center was worthwhile. All of the students seemed to enjoy it. It provided a nice integration of the mechanics and electronics we’ve been learning about all year, and a glimpse of where technology is taking us in the future.