With the help of Scott Woodbury from the Shaw Nature Reserve, Dr. Sansone lead the effort to remove the six mature Bradford Pear trees from the front of the school over the last interim. We collected slices of each of the trees so students could do a little dendrological work with the tree rings.
The trees were planted as part of the original landscaping of the school campus. They’re pretty in the spring and fall, but are an aggressive invasive species.
The fast growth, however, make for wide growth rings. In fact, in addition to the annual rings, there are several millimeter wide sub rings that are probably related to specific weather events within the year. I’d like to see if we can co-relate some of the sub-ring data to the longer term instrumental record of the area.
The tree cutting was quite fun as well, despite being done on a cold day near the end of November. Students helped stack logs and organize branches along the road for the woodchipper. I learned how to use a chainsaw.
Six Bradford Pear tree slices, cut on November 25th, 2013.
At the suggestion of Mr. Elder, I put together a Crime Scene Investigation (CSI) simulation for one of our afternoon interim activities. Sixteen students were challenged to solve a murder/mystery using simulated blood tests, fingerprinting, hair analyses, and chemical tests for drugs. And the assailants and the victims were members of the group.
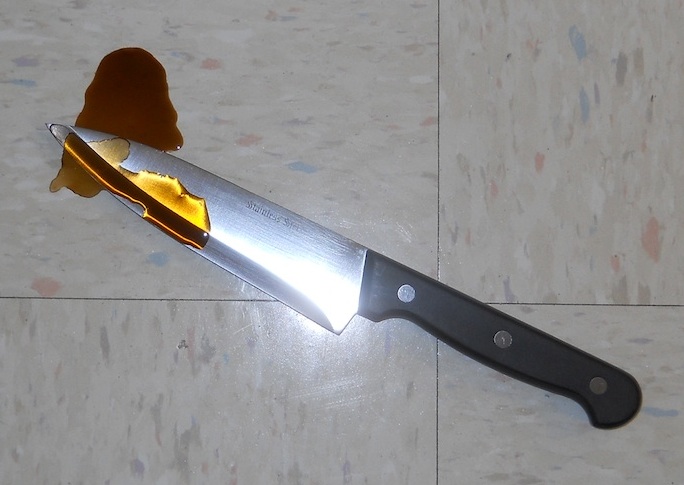
Knife at the crime scene.
I set up the crime scene with four different lines of evidence — fingerprints, hair, blood, and drugs — and forensic methods, so I could break my students up into four groups. The students were all told that they were competing to solve the mystery; to find out what happened and who did what to whom. Without any coaxing, the groups each claimed proprietary rights one type of evidence and set about trying to solve the mystery on their own. Since none of the lines of evidence could explain everything from the crime scene they ended up having to combine what they all found.
A blood soaked murder weapon (also with fingerprints and hair sample).
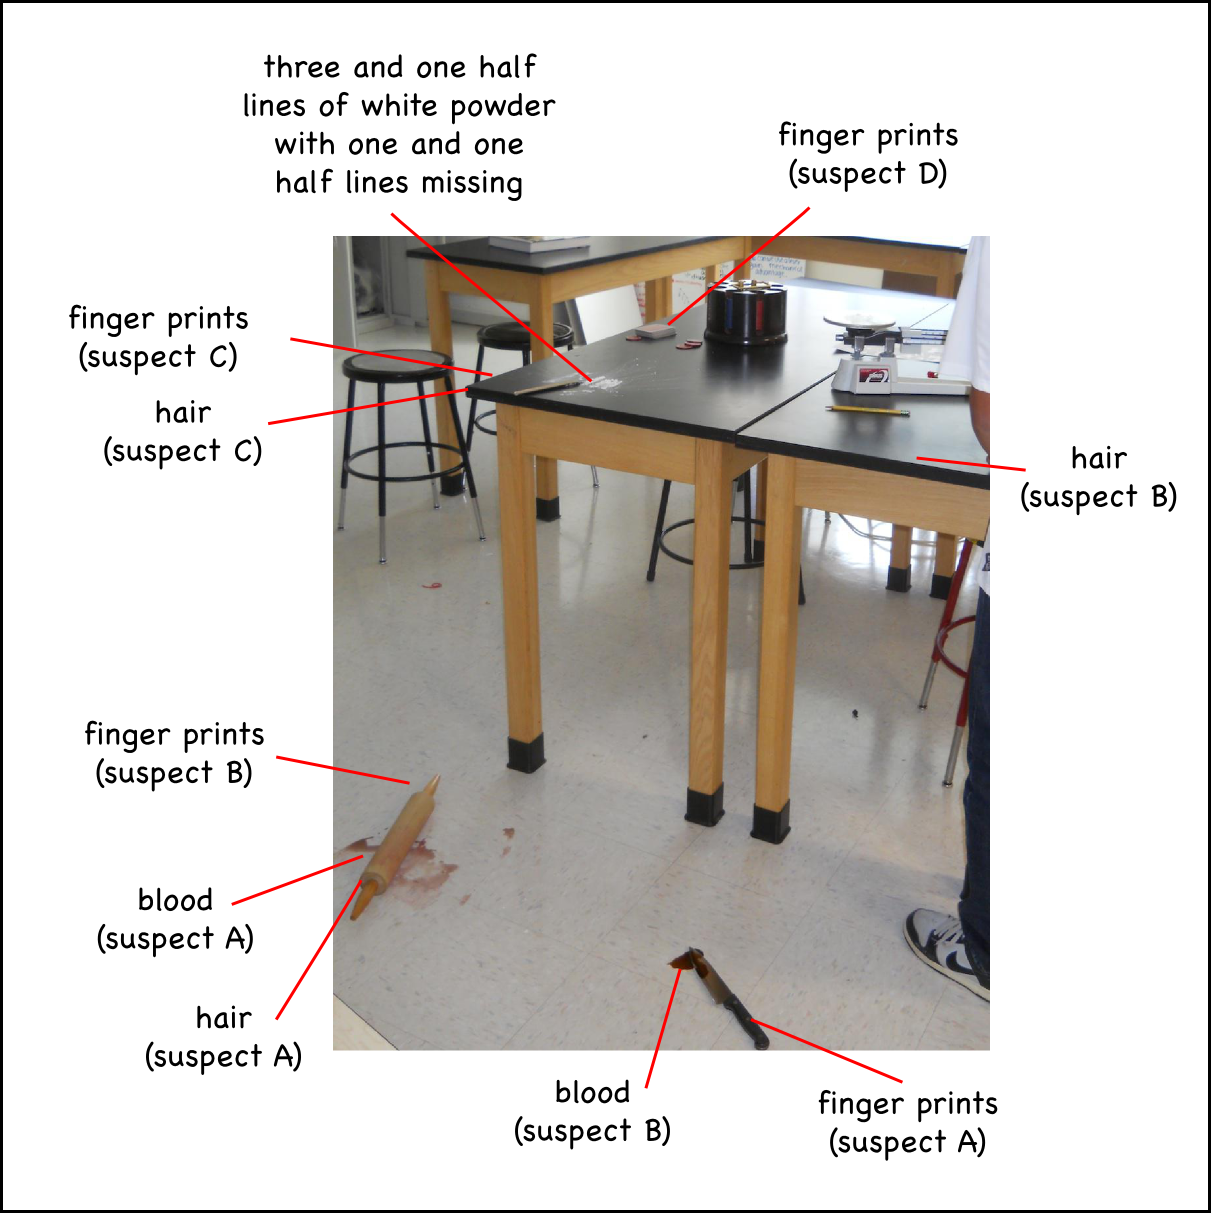
The Crime Scene
There were two weapons lying on the floor: a bloody knife and a bloody rolling pin with a hair stuck to it. On the table above the weapons were a few lines of white powder. There seemed to have been originally four lines, but one and one half of them had been used. There were fingerprints and a strand of hair next to the powder lines.
Also on the table, close to the powder, were a deck of cards (with fingerprints), a set of poker chips, a scale, and another stray hair.
Fortunately for our detectives, the fingerprints and hair had already been pulled and tagged.
The crime scene setup.
Acquiring the Evidence
It took quite a bit of effort to acquire and plant the evidence. Some of it, like the blood, was simulated, but I had to get the hair and fingerprints from the students themselves. Since the individuals who chose this activity were a self-selected fraction of the middle and high-schoolers, I wandered around the building at lunchtime at the breaks between classes trying to find one or two students who were by themselves or were in a group with others who had not chosen the CSI activity.
The crime scene setup really only requires evidence of two people, but to keep it a little more mysterious I used a little misdirection. I got five students to contribute fingerprints and hair, but told them all that they’d be the murderer. I also got one person who was not in the class to contribute as well so we’d have a set of completely mysterious evidence.
Fingerprints
I pulled fingerprints by having students rub their fingers on a black spot I’d created using a basic number 2 pencil. The student would get the black graphite on their fingers and then touch their fingertips to the sticky part of some clear tape. The fingerprints turned out quite clearly that way.
Since I did not have time to figure out how to transfer the fingerprints to the surfaces I wanted them on, I just stuck the pieces of clear tape where I wanted them in the crime scene, which also saved the detectives a bit of time and effort.
Once I told them how to get the fingerprints from their peers, the students did not need any other guidance about how to analyze the fingerprints. They took the imprinted sticky tape and stuck them to a sheet of white paper, where the black prints showed up quite nicely. Then they fingerprinted everyone in the classroom and compared, looking for whirls and swirls primarily, but also basing their conclusions on the size of the prints which they took to be indicative of gender.
Comparing fingerprints.
Of the four sets of prints, they were able to accurately identify the two people who were holding the knife and the rolling pin. The misidentified the one set that was from a person not in the class, and could not find the match for the last set.
Interestingly, of the four students in the group, two did most of the work while the other two wondered off to join other groups.
Hair
Hair was easy enough to collect since the students were quite happy to donate one or two for the cause. One hair per student would have been sufficient, but I kept loosing them until I just decided I’d stick them onto a piece of clear sticky tape and leave the sticky tape with hair attached at the scene of the crime.
Examining hairs under the microscope.
With only a little nudging, the group working on the hair realized that they could get out one of the compound microscopes to examine their specimens, and compare them to the students in the class.
One major indicator that helped with the hair identification was the length. Two of the hair samples were from girls with long hair, while one was from a fairly short haired boy. I did consider just leaving pieces of the hair as evidence, instead of whole strands, but it’s a good thing I did not since, for one reason or another, the hair group had a difficult time identifying the owners of their samples (lack of effort might have been one part of it). It did help a bit that the two major perpetrators of the crime were members of that group.
Drugs
My idea here was to simulate a drug (cocaine) deal gone bad because of a contaminated/cut product. I laid out three lines of corn starch to simulate the cocaine and one line powdered glucose in between the last two cocaine lines to represent the adulterated drug. I removed the last cocaine line and half of the glucose line to make it look like someone had been ingesting the lines and stopped part-way through.
The lines of powdered substance (cocaine) were severely disrupted by student’s sampling, but you can still see the two full lines to the right and the half line that the spatula is touching.
Since we’ve been testing for simple and complex carbohydrates in biology and chemistry classes I told the group testing the drugs that the test for cocaine was the same as the iodine test for starch: if you add a drop of potassium iodine to a starch solution then it turns black.
If the students had examined the drugs on the table closely enough they should have been able to see that the glucose line was different from the others; it was not as powdered (so the crystals were small but visible), and it did not clump as much as the corn starch. However, they did not, and I had to hint that they should perhaps test all the lines of powder instead of just the first sample they took.
When they discovered that one of the powder lines did not react with the potassium iodine, I told them that a common adulterant was sugar so they should perhaps test for that. One of the students remembered the Benedicts solution test, which they were able to easily conduct since I’d already had the hot water bath set up for them.
Testing for glucose.
Looking through the United Nations Office on Drugs and Crime’s Recommended Methods for the Identification and Analysis of Cocaine in Seized Materials, it seems that a common test for cocaine (the Scott test) turns a solution blue when the drug is present, so the next time I try this I may have to find some tests that produce a similar color change.
Blood/DNA testing
Simulating the blood testing was one of the trickier parts of the procedure for my part since I had to keep things very organized when students started being sent to me to be blood tested.
The blood was actually a few drops of food coloring diluted into 10 ml of water. I used three drops of red in each case to try to at least get it to a somewhat blood-like color, but then in mixed in one or two other colors to get five unique blood types.
The number of drops of food coloring mixed with 10 ml of water to get the 5 blood types.
Type 1: 3 red + 1 blue
Type 2: 3 red + 1 green
Type 3: 3 red + 1 yellow
Type 4: 3 red + 1 green + 1 yellow
Type 5: 3 red + 1 blue + 1 yellow
To match everything up with the crime scene, I assigned Suspect A to have Blood Type 2, and Suspect B to have Blood Type 4. So a sample of Blood Type 4 went on the knife, and a sample of Type 2 went on the rolling pin.
As a result, when the blood type testing group wanted to blood test everyone in the classroom, I had them send the students to me one at a time and I handed each student a small cup with a random sample of one of the Blood Types, except for the two students whose blood were on in the crime scene. With 16 students, we ended up with three or four students with each blood type.
Blood type testing using chromatography. The little containers of food coloring can be seen to the upper left.This blood sample — from the rolling pin — is beginning to separate into its constituent colors (red, yellow and blue).
The students took their blood samples back to the testers who I’d shown a simple chromatography method. They’d cut out thin (< 1cm wide) strips of coffee filter, put a drop of the blood sample on the middle of the strip, and then taped it down to a sheet of clear overhead transparency film. Although any clear glass or plastic would have worked, the transparency film was nice because you could tape five coffee filter strips to one sheet and then loosely roll the sheet up and put one end into a partially filled beaker of water (see Figure above). Capillary action sucked the water up the strips and smeared out the blood samples so you could see its constituent colors.
The method worked pretty well, and the students were able to compare the blood at the crime scene to their test results to identify the small group of people who shared the suspect blood types. It was a lot of work, and it would have taken much longer if the group doing it were not amazingly organized and worked extremely well together.
This method is more akin to blood type testing than DNA testing, which I’d have liked to simulate better, however I did not have the time to work on my chromatography method.
In Conclusion
It took a little coaxing to get them to the right conclusion in the end, but I and the student had a lot of fun solving the mystery.
Our initial briefing on getting to the Heifer Ranch.
We’re off to Heifer International again with a new crop of middle-schoolers. This time Ms. Vranas is the other chaperone.
With stopping for lunch, stopping for gas, and stopping by a grocery to pick up supplies, the trip out lasted over 8 hours, but we made it out with everyone in good humor. The kids played Head’s Up Seven Up, and their own stashes of snack food.
I use these trips to introduce geology, specifically the dynamics of mountain-building and erosion using the Ozarks as an example. So every time we passed an outcrop (of which there were quite a number) I pointed it out and one of the students would invariably shout out “limestone” (and sometimes it actually was). I’ll actually try to take pictures of the outcrops on the way back when I’m not driving.
After dinners, I usually have the students spend an hour on reflection and discussion. The group gets split in two. While one half writes I discuss something we’ve seen with the other half.
I was planning to talk about the sequence of outcrops tonight, however, the discussion broke in a slightly different direction.
Just after crossing the Arkansas river, I’d asked the students why the land was so flat. It was because we were on the floodplain, but few of them had picked it up. In fact, most of them had not even noticed we’d crossed a fairly large river on a big concrete bridge not 30 seconds before.
So we started talking about why the flood plain is flat, then got on to the erosion of mountains and the deposition of the eroded material on the flood plains and river deltas. The key factor in erosion and deposition is the energy of the stream, which is a function of the slope. This in turn lead us to to talk about the Nile River – as an example -, which lead to the Great Pyramids, and how the fertility of floodplains lead to agriculture and civilization in Egypt, Mesopotamia, Cahokia, and along the Indus. I ended by pointing that most major cities are located on rivers because of their agricultural fertility, and perhaps more importantly today, the utility for transportation.
A) A landscape profile showing areas of erosion and deposition, including a delta. B) An erosional and depositional (lower) valley. C. Map view of a delta (like the Mississippi River delta). D. An older mountain range that’s been eroded.
When the discussions and writing groups broke up, a few started to play Bananagrams, while the rest got a little rowdy. So I pulled them all in again and we talked a little about adolescent development, self-control, and the development of the frontal lobe, as I read them the riot act on proper behavior. It turned into a pretty neat discussion, because they ended up interrogating me about the way I behave toward them: why I always pause a moment before answering even their simplest questions; why I laughed two weeks ago when one of them told me that I was their, “least favorite teacher”; things like that.
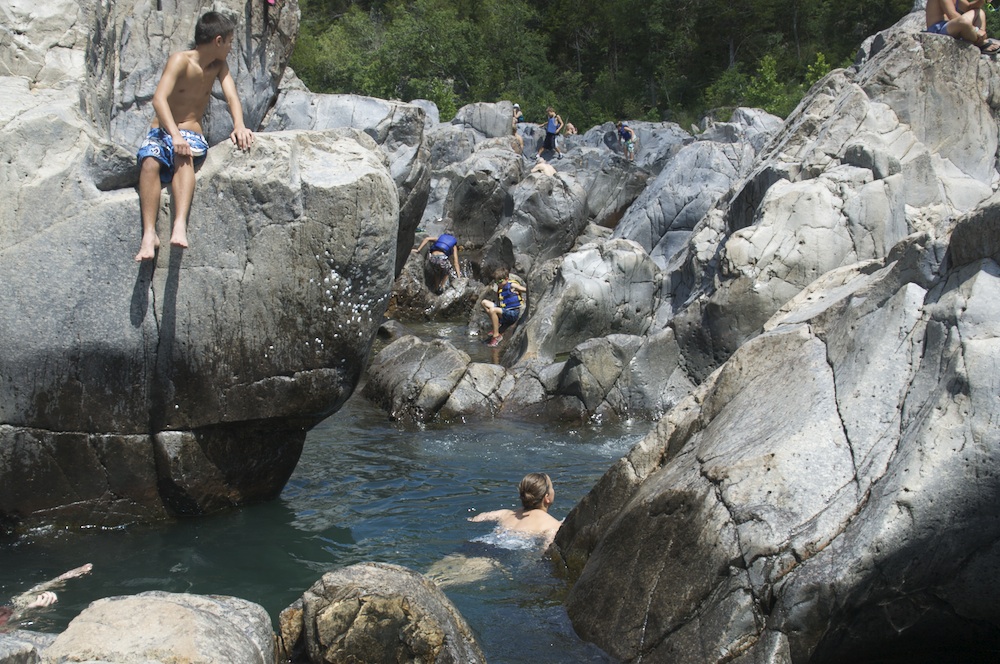
Exploring the natural water works at the Johnson’s Shut Ins.
First off, the Shut Ins are narrower constrictions in the river valley formed when stream flows into an area of harder rock. The hard rock, in this case an old (1.5 billion year old) rhyolite flow, is relatively resistant to erosion, especially the side-to-side erosion that flattens out little flood plains as small rivers meander through the foothills of old mountains like the Ozarks. So the stream only erodes downward through the hard rocks creating a narrow gorge. As they say here: the river’s “Shut In”.
When I told people that I wanted to do a few camping trips this summer, the number one recommendation was the Shut Ins. And I can see why. I took my boys and they had an awesome time.
“It’s like the City Museum. Only real.”
— Overheard at Johnson’s Shut Ins
The Shut Ins are a maze of narrow channels, the old igneous rocks carved smooth by the water and its gravelly bed load over millions of years. A great place for kids to traipse through and explore. I bit like a water-park version of the City Museum in St. Louis.
Rushing water in a shallow channel leads to a deeper pool.Looking down from the cliffs above the Shut Ins, the sets of linear joints in the rocks are quite clear.
The pattern of the channels is largely determined by the jointing in the rocks, because the joints offer easier pathways for water and erosion. There are at least two obvious sets of joints in the rocks, but I would not be surprised if they overlay other patterns given how old the rocks are. As it is, however, the erosion through the joints creates lots of neat little chutes.
Looking along a narrow eroded joint.
Since the Shut Ins are only a couple hours away from St. Louis, they’re a pretty popular tourist attraction.
Population density is high.
There’s a lot of science that can be done here, however, that would make this a good location for an immersion trip, especially since Elephant Hills State Park (with wonderful spheroidal weathering) is close by. The camping facilities at the Shut Ins State Park are new and quite nice, having been completely rebuilt with some of the $100 million in settlement money from the Ameren power company after the park was flooded by their Taum Sauk reservoir breach in 2005.
The path of the wave from the Taum Sauk reservoir breach created a debris field with huge boulders, and demolished the original Johnson’s Shut Ins campground. The Shut Ins themselves are downstream to the right.
It’s certainly worth the visit.
As the stream exits the Shut Ins it has dredged some excellent swimming pools.
Ms. Wilson believes that the City Museum makes a great field trip for her geometry class. I think she has a point.
I had my pre-Calculus students take pictures of curves at the City Museum. Ms. Wilson’s geometry students had to photograph shapes and angles instead. Then they had to put together a slideshow of what they found, which, from what I heard, went very well.
Despite choosing to traipse through the prairie while geocaching, my students’ only encounters with fauna were along and on the side of the road.
Now, I tend to be terrible at identifying animals, but only last week I ran into an eastern garter snake so I actually knew something about this meter-long specimen that was stepped on by one of my students while she was running back to the Audubon Center. I convinced the group to leave it alone since these snakes do bite — even though they’re not poisonous — and release a bad-smelling odor when threatened. And this guy was somewhat traumatized.
As for the student. She was somewhat traumatized too, but got over it soon enough. I think she was more put out by the fact that when she told her mom about it that night, her mom’s first response was, “That poor snake.”
The size of the reddish-brown band on wooly bear caterpillars, Pyrrharctia isabella, is supposed to predict the severity of the winter. A wider band the milder the winter.