Adam Hadhazy, in Discover Magazine, summarizes the top candidates to explain dark matter and the experiments in progress to find them. These include, WIMPs (Weakly Interacting Massive Particles, Axions, Sterile Neutrinos, and SIMPs (Strongly Interacting Massive Particles.
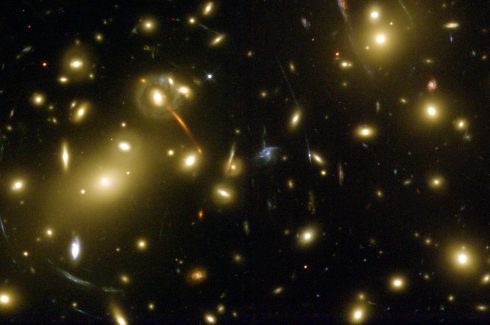
Distortions in the shapes of galaxies caused by gravitational lensing. While gravitational lensing is caused by anything with gravity (this means normal matter as well) the lensing effect of dark matter is a key form of evidence for its presence. Image of the galaxy cluster Abell 2218 via Wikimedia Commons.
via Brian Resnick on Vox, who provides some very interesting historical context on the discovery of dark matter.
The last sub-atomic particle discovered was the Higgs boson, which is shown in the graph below.
Finding the Higgs Boson “The strongest evidence for this new particle comes from analysis of events containing two photons. The smooth dotted line traces the measured background from known processes. The solid line traces a statistical fit to the signal plus background. The new particle appears as the excess around 126.5 GeV. The full analysis concludes that the probability of such a peak is three chances in a million. ” from ATLAS.
Now that we’ve learned how to draw individual atoms (and have an online reference for the first 20 elements), let’s consider ionic bonding.
The key thing to remember is that atoms all “want” to have their outer electron shells filled. So while a sodium (symbol: Na) atom is happy* enough that it has the same number of protons and electrons (11 each) it could be happier if it got rid of the extra electron in it’s outer shell.
This sodium atom has one electron in its outer shell. It could be happier without it.
It can get rid of the electron by donating it to another atom that would be happier with an extra eletron. Something like chlorine (symbol: Cl) that only has 7 electrons in its outer shell, but wants to have 8.
Chlorine needs one more electron in its outer shell to be happy.
When one atom donates electrons to other atoms this creates a bond called an ionic bond. The molecule created is called an ionic molecule. In this case, sodium and chloride react to produce sodium chloride (chemical formula: NaCl).
Sodium and chloride bond ionically when sodium donates an electron to chlorine. This produces the ionic compound, sodium chloride (NaCl).
The chemical reaction can be written as:
Na + Cl –> NaCl
MgCl2
Now consider what happens when magnesium (symbol: Mg) reacts with chlorine.
Magnesium has two electrons in its outer shell that it wants to get rid of.
A magnesium (Mg) atom, which has two electrons in its outer shell that it would like to, if possible, get rid of by bonding.
A single chlorine atom can’t take both, since chlorine only needs one electron to fill its outer electron shell. However, magnesium can give one electron to two different chlorine atoms to create a molecule with three atoms total.
Magnesium gives one electron to each of the two chlorines to create magnesium chlorine.
The resulting compound is called magnesium chloride, and is written as MgCl2. The subscripted 2 indicates that there are two chlorine atoms in each magnesium chloride molecule.
The chemical reaction can be written as:
Mg + 2 Cl –> MgCl2
Notice that each magnesium atom reacts with two chlorine atoms (Mg + 2 Cl) to produce a compound with one magnesium and two chlorines bonded together (chemical formula: MgCl2).
Practice
Now, for homework, you can try figuring out what is the chemical formula for the following ionic compounds:
Potassium and Florine
Beryllium and Chlorine
Sodium and Oxygen
Magnesium and Oxygen
Be sure to:
Draw the atoms that you will be reacting,
Show how the electrons are donated,
Write the chemical formula of the resulting compound,
Write the chemical reaction.
Good luck. Next we’ll try covalent bonding.
* Think of happiness as energy. Like people, atoms are happier to be in low energy states.
Notes
When we looked at the patterns in the periodic table, one of the things I had my student graph was the electronegativity. Electronegativity is the ability of atoms to attract electrons to themselves. You’ll note that chlorine’s electronegativity is high, while sodium’s is low.
The repeating pattern in electronegativity shows up quite well in the first 20 elements.
So chlorine will attract electrons to itself strongly, while sodium will not. This is why (more or less) sodium will end up donating its electron and why chlorine is happy to accept it.
When atoms with a large difference in electronegative bond together, the bonds tend to be ionic.
Having demonstrated how to draw a few simple atoms, I had students fill out a periodic table template with drawings of the first twenty atoms. Actually, I only had them draw the electrons in their shells because it reduced the messiness of trying to fit in forty nuclear particles into a small tile, and the point I wanted to get at was the pattern of shells and valence electrons in the periodic table.
The end result looked something like this:
Students learn the relationship between electron configuration and position in the periodic table. Diagram by E.F..
All the drawing only took about 15 minutes, and once they’d figured out the first half dozen or so it started to get a little boring. But that freed up the cognitive resources so they could notice the two key patterns.
First, each row in the periodic table has an additional electron shell.
Second, as you go across a row you add one electron to the shell until it is filled.
It’s a first glimpse at the periodicity in the periodic table. And it sets us up nicely to be able to talk about chemical bonding.
This year, I’ve been basing my introduction to basic chemistry for my middle school students around the periodic table of the elements. The first step, however, is to teach them how to draw basic models of atoms.
Prep: Memorization over the Winter Break
I started it off by having the students memorize the first 20 elements (H through Ca), in their correct order — by atomic number — over their winter break.
A diagram of an oxygen atom.
So that they’d have a bit of context, I went over the basic parts of an atom (protons, neutrons, and electrons) and made it clear that the name of the element is determined solely by the number of protons. I even had them draw a few atoms with the protons and neutrons in the center and the electrons in shells. Since I’d dumped all of this on them in a single class period, it probably was a bit much, but since it was just to give them some context I did not expect the 7th graders, who had not seen this before, to remember it all; for the 8th graders it should have been just a review.
Most students did a good job at the memorization. Some found songs on the the internet that helped, while others just pushed through. Having the two weeks of winter break to work on it probably helped too.
Day 1. Lesson: The Parts of an Atom
When we got back to school, the first thing I did was give them an outline of the upper part of the periodic table and asked them to fill it in with the element names.
Template for the first 20 elements of the periodic table. (pdf)
After they’d filled out their periodic table template, I went into the parts of the atoms in more detail, and had them practice. The key points I wanted them to remember were:
The atomic number is written as a subscript to the left of the element symbol.
The atomic number is the number of protons. Since they memorized the elements in order, they should be able to figure this out on their own — but they could also look it up quickly on the periodic table, or look at the element symbol where the atomic number is sometimes written on the lower left.
The atoms have the same number of electrons as protons. Protons are positively charged, and electrons are negatively charged, so an atom needs to have the same number of both for its charge to be balanced. We don’t talk about ions –where there are more or less electrons– until later.
The atomic mass (4) is written as a superscript to the left of the element symbol. The atomic mass is the sum of the number of protons (2) and the number of neutrons (2).
The small atoms that we’re looking at tend to have the same number of neutrons as protons, but that’s not necessarily the case. So how do you know how many neutrons? You have to ask, or look at the atomic mass number, which is usually written to the upper left of the atom. Since the atomic mass is the sum of the number of protons and neutrons, if you know the atomic mass and the number of protons, you can easily figure out the number of neutrons. (Note that electrons don’t contribute to the mass of the atom because their masses are so much smaller than the masses of neutrons and protons.
This oxygen atom has 8 electrons in two shells.
Electron Shells: Electrons orbit around the nucleus in a series of shells. Each shell can hold a certain maximum number of electrons (2 for the first shell; 8 for the second shell; and 8 for the third). And to draw the atoms you fill up the inner shells first then move on to the outer shells.
So, if I wrote just the element symbol and its atomic mass on the board that students should be able to figure out the number of particles.
Example: Carbon-12
For example, the most common form (isotope) of carbon-12 is written as:
Protons = 6: Since we know the atomic number is 6 (because we memorized it), the atom has 6 protons.
Neutrons = 6 : Since the atomic mass is 12 (upper left of the element symbol), to find the number of neutrons we subtract the number of protons (12 – 6 = 6).
Electrons = 6: This atom is balanced in charge so it needs six electrons with their negative charges to offset the six positive charges of the six protons. (Note: we haven’t talked about unbalanced, charged atoms yet, but the charge will show up as a superscript to the right of the symbol.)
Electron shells (2-4): We have six electrons, so the first two go into filling up the first electron shell, and the rest can go into the second shell, which can hold up to 8 electrons. This gives an electron configuration of 2-4.
Diagram of a carbon-12 atom.
Example: Carbon-14
Carbon-14 is the radioactive isotope of carbon that is often used in carbon dating of historical artifacts. It is written as:
Protons = 6: As long as it’s carbon it has six protons.
Electrons = 6: This atom is also balanced in charge so it also needs six electrons.
Neutrons = 8 : With an atomic mass of 14, when we subtract the six protons, the number of neutrons must be 8 (14 – 6 = 8).
The only difference between carbon-12 and carbon-14 is that the latter has two more neutrons. These are therefore two isotopes of carbon.
Diagram of a carbon-14 atom.
Example: Helium-4
Diagram of helium-4 atom.
Example: Sodium-23
Diagram of sodium-23 atom.
Note: A picture of a hydrogen atom can be found here.
Update: I’ve created an interactive app that will draw atoms (of the first 20 elements), to go with a worksheet for student practice.
Elements can be identified from the color of light they give off when they’re ionized: their emission spectra. Ms. Wilson’s chemistry class today set fire to some metal salts to watch them burn.
A hydrogen atom's electron is bumped up an energy level/shell by ultraviolet light, but releases that light when the electron drops back down to its original shell.
She placed the salt crystals into petri dishes, submerged them in a shallow layer of alcohol, and ignited the alcohol. As traces of the salts were incorporated into the flames, the metal atoms became “excited” as they absorbed some of the energy from the flame by bumping up their electrons into higher electron shells. Since atoms don’t “like” to be excited, their excited electrons quickly dropped back to their stable, ground state, but, in doing so, released the excess energy as light of the characteristic wavelength.
Emission and absorption spectrum of Hydrogen. Image adapted from the one by Wikimedia Commons User:Adrignola.
When a photon of light hits an atom three things can happen: it can bounce off; it can pass through as if nothing had happened; or it be absorbed. Which one happens depends on the energy of the light, and which atom it is hitting. Hydrogen will absorb different energies from helium.
The interesting thing is that each atom will only absorb photons with exactly the right energy. You see, when the light hits the atom, the atom will only absorb it if it can use it to bump an electron up an electron shell.
An oxygen atom with two electrons in the innermost shell and six in the second shell.
An oxygen atom, for example, has eight electrons, but these fit into two different electron shells. The innermost shell can only hold two electrons, so the other six go into the second shell (which can take a maximum of 8). This is the “ground state” of the atom, because it takes the least amount of energy to keep the electrons in place.
However, if the atom gets hit by just enough energy, one of the electrons can be bumped up into a higher shell. The atom will be “excited” and “want” the electron to drop back down to the lower shell.
And when the electron drops back, it will release the exact same amount of energy that it took to move it up a shell in the first place.
A hydrogen atom's electron is bumped up an energy level/shell by ultraviolet light, but releases that light when the electron drops back down to its original shell.
For hydrogen, the energy to bump up an electron from its first to its second electron shell comes only from light with a wavelength of 1216 x 10-10m (see here for how to calculate). This is in the ultraviolet range, which we can’t see with the naked eye.
However, the energy absorbed and released when the electron moves between the second and fourth shells is 6564 x 10-10m, which is in the visible range. In fact, it’s the red line on the right side of the emission spectrum shown at the top of the page.
The visible part of the emission spectrum of hydrogen and its corresponding electron shell jumps. Note that different colors of light have different energies, and that the blue light is more energetic (and has a shorter wavelength) than red light.
Since this emission signature is unique for each element, looking at the colors of other stars, or the tops of the atmospheres of other planets, is a good way of identifying the elements in them. You can also do flame tests to identify different elements.
Copper.
Lithium.
Sodium.
The University of Oregon has an excellent little Flash application that shows the absorption spectrum of most of the elements in the periodic table (NOTE that the wavelengths they give are in Angstroms (Å) which are 1×10⁻¹⁰m; or tenths of a nanometer (nm)).
Interactive app that shows the absorption spectrum of the elements in the periodic table. From the University of Oregon. Wavelengths are in Angstroms (Å), and 1 Å = 0.1 nm.
Equations
The wavelength of light emitted for the movement of an electron between the electron shells of a hydrogen atom is given by the Rydberg formula:
where: = wavelength of the light in a vacuum = Rydberg constant (1.1×10⁷ m-1) and are the electron shell numbers (the innermost shell is 1, the next shell is 2 etc.)
Brian Cox explains (on the BBC) explains how electron shells are like standing waves, and how that relates to the sizes of atoms, and explains why atoms are mostly space.


 = wavelength of the light in a vacuum
 = Rydberg constant (1.1×10⁷ m-1)
 and
and  are the electron shell numbers (the innermost shell is 1, the next shell is 2 etc.)
 = Energy (J),
 = 6.6×10⁻³⁴ Js,
 = speed of light in a vacuum (3×10⁸ m/s).