One of the librarians at Washington University played this video for our students. It was a great supplement to their lesson on how to use the internet for research.
Month: February 2012
How to do Research on the Internet: A Lesson
This morning I did a little presentation with the middle school on how to do research on the internet, and we actually had a very good discussion. I focused on two key things: assessing credibility and writing citations (giving credit).
Credibility
[Henry] Hudson’s main goal as an explorer was to find a northern passage to the Orient. … He started his journey in May of 1607 and returned in September of the same year when his route was blocked by the Great Barrier Reef.
— All About Explorers (accessed Feb. 2012): Henry Hudson
I started by having the students to look up some explorers. If you prefix an explorer’s name with “all about explorers” (e.g. “all about explorers Christopher Columbus) the first link on google leads to the right website.
They were supposed to read the page and recorded three facts that they found interesting, but, in doing so, it pretty quickly becomes apparent that the information might not be very reliable; Columbus did not, after all, have to rely on infomercials to build support for his expedition.
The All About Explorers website was created by a group of teachers to be a tool for teaching about how to do research on the internet.
Having them see the site come up on google is, I think, better than sending them directly to the url. Google is usually their first recourse for researching anything, so it’s nice to see that google does not give information about credibility.
The discussion that ensued ranged pretty widely, but a key question that kept recurring was: how do you judge the credibility of a website. We talked a little bit about the possible biases of commercial .com and .net websites, and about the fact that .org’s may well also have their own biases, since it does not require any credentials to set one up (see montessorimuddle.org for example). On the other hand, while .gov and .edu domains (as well as most U.S. state and other country websites) are restricted to governments and colleges, that improves their credibility, but, in itself, is no guarantee of accuracy or being unbiased.
So much of assessing websites’ credibility comes from experience, which students just don’t have much of yet, so I recommended that checking with teachers and adults might be a good bet. Confirming data from multiple sources also helps, but you have to be careful, since so many websites now use Wikipedia as a source (or even reprint things directly from Wikipedia) that any errors in a Wikipedia page can spread far and wide pretty fast.
We did not get into how to use Wikipedia well (go for the sources at the bottom of the page), but we’ll get to that later.
Citing
For the second part of the lesson, I had them look up the same explorers they’d searched on the All About Explorers website. They had free range to search anywhere they wanted, but not only did they have to now collect facts but were to also find a good picture.
I’d wanted the pictures so we could talk about copyright and getting permissions to use media, but we did not get that far.
While they were satisfyingly more skeptical about where they got their information from, they were quite happy to give me the facts they’d found without attribution.
So I took the chance to talk about citing sources: to give credit where it is due; to avoid even the appearance of plagiarism; to give your reader an idea of how credible your sources are (and by extension how credible you are); and to let you readers know how up-to-date your information is.

Conclusion
For the next week or so the middle and high school are on an interim. This is our writing interim, so they’ll be working on research projects (including how to do research) and creating publications (I’m in charge of the science journal).
Since more and more research is going online, hopefully this was a good primer to get students started.
Using the Binomial Cube in Algebra
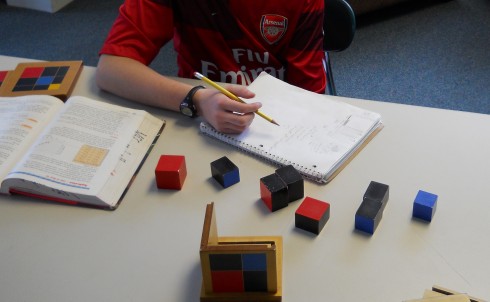
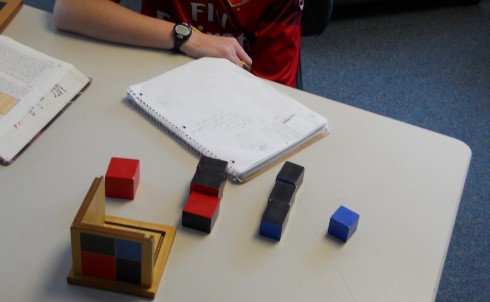
After working with the hundred-squares, ten-bars, and thousand-cubes to figure out how to add polynomials, we borrowed the binomial and trinomial cubes to practice multiplying out factors. It’s a physical way of showing factor multiplication.
Binomial Square
You can first look at the binomial cube in two-dimensions as a binomial square by just finding the area of the top layer of four blocks.
If you label the length of the side of the red block, a, and the length of the blue block, b, you can calculate the areas of the individual pieces simply by multiplying their lengths times their widths.
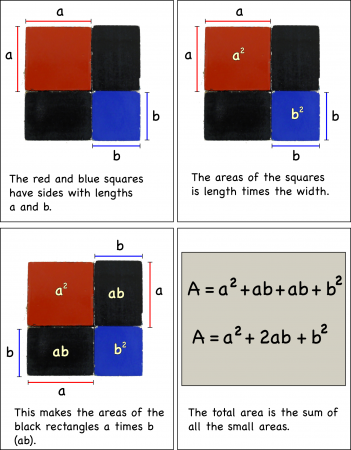
Adding up the individual areas you get the area of the entire square:
However, there is another way.
If you recognize that the length of each side of the entire square is equal to (a+b).
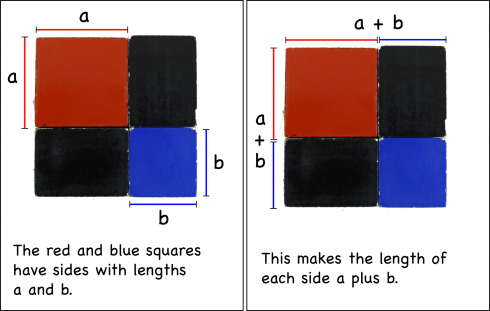
Then the total area is going to be total length (a+b) times the total width (a+b):
We can multiply this out (using FOIL is easiest):
which simplifies to give the same result as adding up the individual areas:
The Binomial Cube
We can do the same thing using the entire cube by recognizing that the volume of the cube is the length times width times the depth, and all of these dimensions are the same: (a+b).
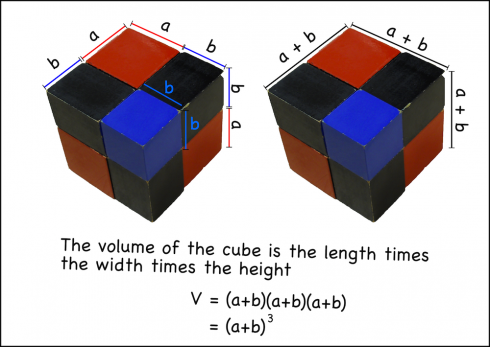
Now the students can go through the same process of multiplying out the factors, and can check their work be seeing if they get the same number of pieces (and dimensions) as the physical cube.
Emission Spectra: How Atoms Emit and Absorb Light

When a photon of light hits an atom three things can happen: it can bounce off; it can pass through as if nothing had happened; or it be absorbed. Which one happens depends on the energy of the light, and which atom it is hitting. Hydrogen will absorb different energies from helium.
The interesting thing is that each atom will only absorb photons with exactly the right energy. You see, when the light hits the atom, the atom will only absorb it if it can use it to bump an electron up an electron shell.
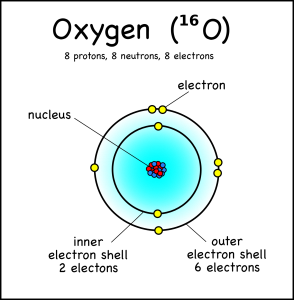
An oxygen atom, for example, has eight electrons, but these fit into two different electron shells. The innermost shell can only hold two electrons, so the other six go into the second shell (which can take a maximum of 8). This is the “ground state” of the atom, because it takes the least amount of energy to keep the electrons in place.
However, if the atom gets hit by just enough energy, one of the electrons can be bumped up into a higher shell. The atom will be “excited” and “want” the electron to drop back down to the lower shell.
And when the electron drops back, it will release the exact same amount of energy that it took to move it up a shell in the first place.
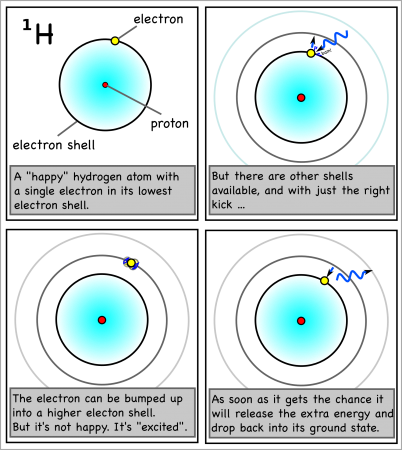
For hydrogen, the energy to bump up an electron from its first to its second electron shell comes only from light with a wavelength of 1216 x 10-10m (see here for how to calculate). This is in the ultraviolet range, which we can’t see with the naked eye.
However, the energy absorbed and released when the electron moves between the second and fourth shells is 6564 x 10-10m, which is in the visible range. In fact, it’s the red line on the right side of the emission spectrum shown at the top of the page.
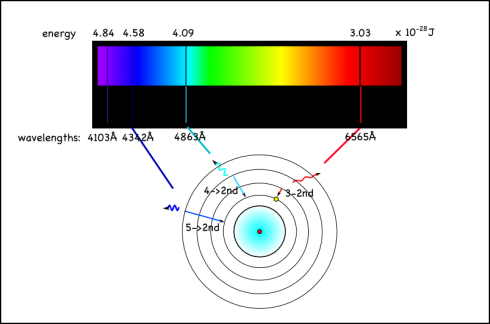
Since this emission signature is unique for each element, looking at the colors of other stars, or the tops of the atmospheres of other planets, is a good way of identifying the elements in them. You can also do flame tests to identify different elements.
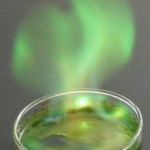
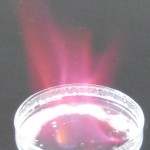
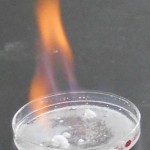
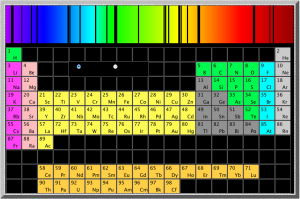
The University of Oregon has an excellent little Flash application that shows the absorption spectrum of most of the elements in the periodic table (NOTE that the wavelengths they give are in Angstroms (Å) which are 1×10⁻¹⁰m; or tenths of a nanometer (nm)).
Equations
The wavelength of light emitted for the movement of an electron between the electron shells of a hydrogen atom is given by the Rydberg formula:
where:
= wavelength of the light in a vacuum
= Rydberg constant (1.1×10⁷ m-1)
and
are the electron shell numbers (the innermost shell is 1, the next shell is 2 etc.)
— see an example calculation here.
The amount of energy that corresponds to a particular wavelength of light is given by:
where:
= Energy (J),
= wavelength of the light in a vacuum (m),
= 6.6×10⁻³⁴ Js,
= speed of light in a vacuum (3×10⁸ m/s).
— via Wikipedia.
References
The National Institute of Standards and Technology (NIST) has more extensive emission spectra data.