Maggie E. has a wonderful eye for spotting small fauna. She found this mason wasp (Monobia quadridens) while we were weeding the Heifer Ranch’s herb garden. It had caught this caterpillar and was trying to take off with it. It was a difficult job – the caterpillar probably weighed as much as the wasp – but it finally managed to take it away.
The wasp found the caterpillar difficult to move.
According to the Atlas of Vespidae, these wasps prey on small moth caterpillars. Which is probably why they are usually found in open habitats with flowers; hence the herb garden.
They also use caterpillars to feed their larvae (Wikipedia, 2011). They’ll lay an egg in a cell of their nest and stick a paralyzed beetle larvae, spider or caterpillar in with the egg to feed the wasp larvae when it hatches.
References
The wasp finally managed to drag the caterpillar to the edge of the wooden bench before it could take off.
Identifying these wasps was not too hard. The first image in the google search for “wasp caterpillar” looked just like the bug we found, carrying almost the same type of caterpillar.
The image was from the wonderful “What is that bug?” where you can send in bug pictures and the author (Daniel Marlos) will try to identify them.
What’s That Bug referenced the BugGuide which gives the full taxonomic classification and a lot of information about habitat, food and life cycle that’s in an easily readable form.
A spicebush swallowtail butterfly (Papilio troilus) in the herb garden.
At the Heifer International ranch. Time spent weeding the herb garden. Not much weeding done (by me at least), but much photography. Pretty. A word designed for butterflies.
A variegated fritillary butterfly (Euptoieta claudia) in the herb garden.An eastern tiger swallowtail butterfly (Papilio glaucus; officially documented by Linnaeus in 1758).A skipper (family Hesperiidae) extracts nectar from a flower in the herb garden.
Butterflies are classified as:
Kingdom: Animalia
Phylum: Arthropoda
Class: Insecta
Order: Lepidoptera
References
Maggie Eisenberger, personal communication.
Opler, Paul A., Kelly Lotts, and Thomas Naberhaus, coordinators. 2011. Butterflies and Moths of North America. Bozeman, MT: Big Sky Institute. http://www.butterfliesandmoths.org/ (Version 10/08/2011).
I was sorting through my slide collection, while preparing for our recent move, and came across my binder of slides from New York on 9/11. These are actual, physical slides, organized neatly in plastic binder pages, not digital images.
If I remember correctly, I was just visiting the city that day, staying with my grandparents in Brooklyn. The visit was for work, I’d a post-doc lined up at Columbia and I’d lived in the city before, so I’d not thought to bring my camera with me.
So I walked into Manhattan, against the crowds turned out by the silent subways. Edging against the flux of humanity walking across the bridges away from the tragedy.
And I bought a camera, on the afternoon of September 11th, in a small shop somewhere around 32nd Street. The proprietor was sitting behind the glass cases, following what was going on outside on a small television set. Fortunately, the electricity and credit card system were still working. He was happy to sell me a good, used, fully manual Pentax K1000 (just like the one I’d left at home), and enough slide film to get me through the day.
I’ve always had faith in the strength and resiliency of New York. It’s where I’d spent my first four years, as an impressionable teenager, after immigrating to the U.S., but I would not have been able to harbor any doubts about those first, likely naive, impressions after that day. And this was without seeing or even knowing about the heroics at the World Trade Center. All I could see was the calm and matter-of-factness of the people on the street. Though the arteries had clogged, the blood of the city, its people, still flowed.
Nor was I the only one headed towards the dense clouds of smoke, made eerily attractive by the clear sunlight and pellucid skies of that clear September day. I don’t think I would have made it over the bridge if there were not a few other people, hugging against the railing, edging their way across. That infinitesimal trickle turned into a small but steady stream on the streets of Manhattan itself, which was then dammed up by the police line at Canal Street. Being unable to see anything from there, I turned left and joined the crowd this time as took me back across the Manhattan Bridge back into Brooklyn. A flag flies over the Brooklyn Bridge.
I figured the opposite waterfront would be the best place of any for me to get any glimpse of what was going on. So, once across, I looped under the eastern side of the bridge and walked along the roads that edge the shore until I ended up in Brooklyn Bridge Park.
The picture at the top of the post is from the Brooklyn Bridge Park. I managed to get two major icons into the frame that are important personal symbols: a piece of the Brooklyn Bridge is on the right edge and, if you squint, you can see the Statue of Liberty (my favorite landmark) on the left. They’re a good reminder of the history and purpose of this great city. I also like that the picture captures the silhouette of the city dove, a graceful symbol of peace, standing against the roiling clouds of smoke, dust and turmoil.
The western end of Deer Island extends a white, sandy, artificial, spit that partially covers the first of a series of riprap breakwaters that protect the waterfront development of the city of Biloxi. Although we’d landed there to pick up garbage as part of our coastal science camp, the beautifully developed beach profile was worth a few minutes.
Figure 2: Narrow beach typical of the east-west trending shorelines that are not exposed to the direct force of the waves.
The spit curves just ever so slightly northward, so it feels more of the direct force of waves blown all the way along the length of Biloxi Bay. The combination of unvegetated sand and stronger waves makes the beach along the spit looks very different from the beaches that parallel the shore. While the parallel beaches on Deer Island are covered in grass almost to the water’s edge (Fig. 2), the spit has a much wider beach, with a nicely developed sandbar protecting a shallow, flat-bottomed, water-saturated trough behind it (Fig. 1).
While the white beaches are pretty (that’s why they imported this sand after all), there are a number of fascinating features in the trough.
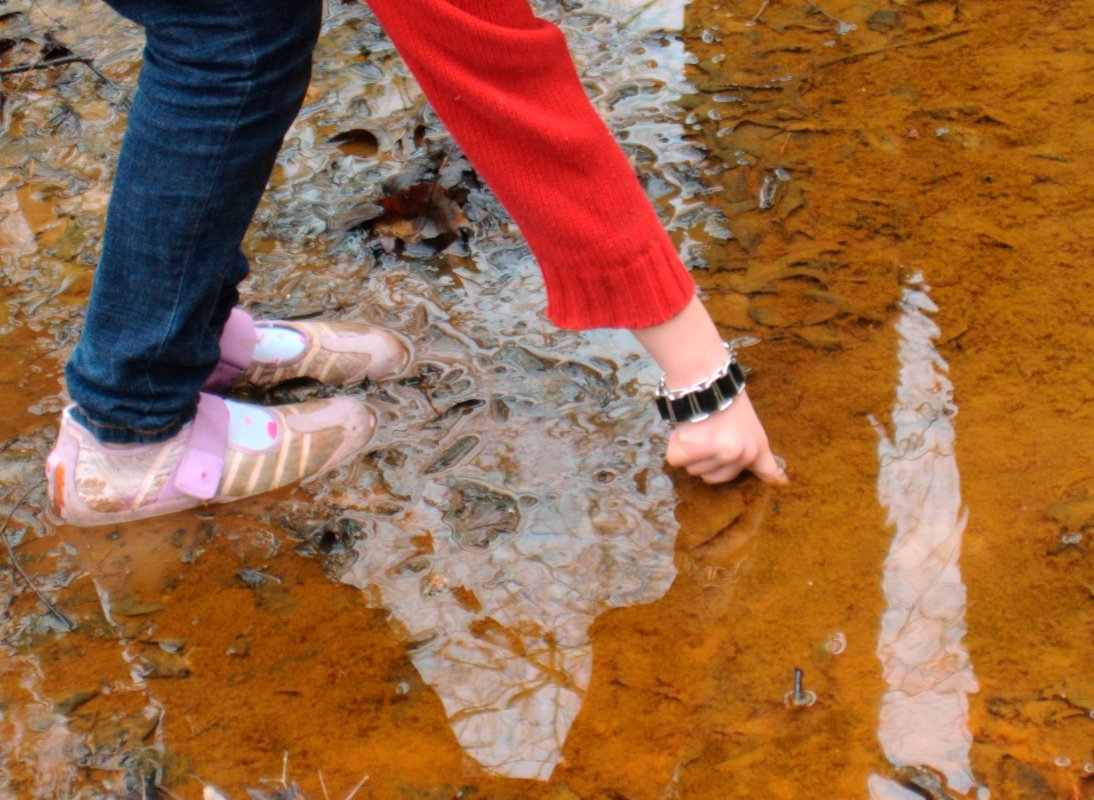
Figure 3: On our Natchez Trace hike we found it quite easy to stick fingers into the red precipitate at the bottom of the stream.
The first, and most obvious question is, why the reddish-orange color in the fine grained sediment at the bottom of the trough? A microscope and a little geochemical analysis would be useful here, however, lacking this equipment, we can try drawing parallels with some of our experiences in the past. In fact, we should remember seeing the same color in some of the streambeds when we were hiking in Natchez Trace State Park in Tennessee (Fig. 3). My best guess at that time was that the red was from iron in the groundwater being oxidized when it reached the surface.
Figure 4: The rich black of decaying organic matter, sits just beneath the rusty-orange surface sediement.Figure 5: Green, organic matter, freshly deposited at the edge of the trough. If it decays while saturated with water it will turn black. Note also the splay of white sand at the top of the picture.
This is probably not a bad guess for the red in the trough as well, since there is some fresh groundwater discharge from the shallow watertable on the island. However, I suspect that the story is a bit more complex, because the rich black color of the organic matter just beneath the surface (Fig. 4) suggest that the shallow water and surface sediment in the trough is lacking in oxygen. On the other hand, it’s not uncommon to have steep geochemical gradients in boundary environments like this one.
The physical and geochemical gradients extend horizontally as well as vertically. At the edges of the trough the organic matter just beneath the surface is green, not black (Fig. 5), because this is the color of the undecayed algae.
At the seaward side of the beach, the waves of Biloxi Bay lap against the sand bar. When the tide rises, and the wind picks up, these waves wash over the crest of the sand bar pushing water and sediment over the top into trough. When the sand washes evenly over the top it creates thin layers (possibly one layer with each high tide). If you cut into these layers you’ll see little the laminations in profile, which, because the layering is close to horizontal, look like the lines of topography on a map (Fig. 6). When the waves wash over small gaps in the sandbar the sediment it transports is deposited in a more concentrated area – these are called sand splays – that overlap and cover some of the fine-grained, orange sediment at the edge of the trough. These are both two of the small ways that the sand bar moves, slowly pushing inland.
Figure 6: Sand splay and laminations on the landward side of the sand bar. The laminations are created by even overwash of the sandbar, while the splay is the result of more concentrated flow.
Bioturbation
The features on the bottom of the trough are a quite interesting because of the observable effects of bioturbation (disturbance by organisms) (Figs. 7, 8 & 9).
Figure 7: In close-up, the holes of the crabs and the mixture of colors looks like an arid, volcanic landscape photographed from space.Figure 8. Digging deep beneath the orange surface sediment, small crabs create mounds of white sand. Figure 9. Footprints of predators. Paleontologists use features like these that are preserved in rocks to discover interpret what the relationships between organisms was like in the past.
Plastic bottles take 100 years to break down; styrofoam cups – fifty years; aluminum cans – 200 years; glass bottles, which are made of silica, just like the beach’s white sand – who knows. So we took a little time out of our adventure trip to collect anthropogenic debris as we walked along the beach on Deer Island.
Leather (shoe) - 50 years.Plastic bags - 10 to 20 years.Styrofoam cup - 50 years.Plastic bottles - 100 years.Tin cans - 50 years. Aluminum cans - 200 years.
We picked up stuff on our way out, so we were able to enjoy the fruits of our labours on our walk back to the landing point.
The beautiful beach cleared of garbage.
Note
The degradation times for marine garbage can be found on the SOEST website, but That Danny has an interesting compilation of data that tries to reconcile the different degradation times you can find on the web.
Styrofoam cup collected from the beach of Deer Island. The city of Biloxi sits in the background.
65 million years ago, an asteroid hit the Earth just off the Yucatan Penninsula, kicking up enough dust in to the atmosphere (and perhaps setting off supervolcanos) to lead to the extinction of the dinosaurs. Geologists mark this mass extinction event as the end of the Cretaceous period and the beginning of the Tertiary; it’s called the K-T boundary. Paleontologists see a rapid change in the forms of life fossilized in the rocks above and below the boundary. The element iridium, which is relatively common on asteroids, but rare on Earth, can be found in a thin layer of the fallout from the asteroid impact all around the world.
The Chicxulub Crater, believed to be the location of the K-T asteriod impact. Image from NASA: Short (2010)
Well, the Earth’s going through another mass extinction event right now. In fact, even if humans were to go extinct right now, the remains of our cities and our impact on the global chemical cycles, will leave a distinct signature that geologists millions of years from now will be able to detect.
Geologists refer to the last 10,000 years, the period starting when the Earth warmed after the last glacial maximum, as the Holocene. This time period saw the emergence of agriculture, the rise of human civilization, cities, nuclear weapons, the internet. Now, given the enormous environmental changes we’re wrecking on the planet, some say we’ve entered a new geologic epoch that they’re calling the Anthropocene.
The question is: How long will it last?
Regardless of your philosophy, the recognition that we have entered a geologic age of humanity raises the obvious question of just how long such an age will last.
In the infamous KT boundary geologists can see evidence for a rather short-lived event that also reshaped the planet. Sixty five million years ago an asteroid struck the Earth, driving one of only five mass extinctions in the planet’s history. The loss of the dinosaurs turned out to be an opportunity for our mammal ancestors and led directly to our own age.
Since the Anthropocene appears to mark a sixth great extinction, one has to wonder what it will take for us to make it out of own era with civilization intact.
We were there to collect garbage, but we found lots of life on the Deer Island part of our adventure trip to the gulf.
Ecotones, the boundaries between different environments tend to be rich in biological diversity.Hermit crabs were everywhere.Comb jelly in the hand.Ospreys nest on the island.Barnicles on a stick.Tiny crab.There were fewer actual snails than there were hermit crabs.Dolphin in the boat's wake.
A beautiful loaf, nested in a hand-made bread bag.
Our bread-baking enterprise was quite popular last year. In the afternoons, just as the loaves were about to come out of the ovens, we’d get the occasional visitor poking their head into our room for “aromatherapy”.
Consumption in progress.
Students also liked the freshly baked bread. Some favored the crust while others liked the insides; which worked out quite nicely most of the time, but I did on occasion come across the forlorn shell of crust, and once, a naked loaf with the crust all gone.
We’d made loaves two at a time. They were big loaves, and that was as much as the students could comfortably kneed.
Equipment for making bread.
Small equipment:
Big mixing bowls: For mixing and kneeding the bread. We used metal ones from the restaurant supply store.
Quart sized mason jars: For collecting all the liquid ingredients (honey, milk, water and butter). These can go in the microwave (take the metal lids off) to quickly melt the butter and warm the liquids for the yeast.
Bread load pans: I prefer glass because, with metal the bottoms tend to burn in our toaster ovens. We can fit two pans per oven.
Two cup measuring cup: For measuring milk and water.
One cup measuring cup: For measuring honey. There probably is an easier way of doing this but we have not come up with it yet.
Dry measuring cup: One cup size.
Measuring spoons: You’ll need the tablespoon, teaspoon and half-teaspoon.
Butter knife: For cutting butter.
Small, sealable, plastic cups (optional): For collecting and storing enough yeast (4.5 teaspoons) for one batch of bread.
Large plastic containers (optional): For storing dry ingredients (flour and salt). They need to be big enough to hold seven cups of flour.
Capital Equipment:
Microwave oven: Necessary for quickly warming the liquids (for the yeast to make the dough rise).
Oven: We used table-top, toaster ovens. If the loaves rose well, they’d get too large and get burned by the top of the oven. We probably could reduce the recipe to prevent this. The ovens were not always reliable, and we had to do a regular calibration to make sure the set temperatures were accurate.
Recipe
The simple ingredients can be bought in bulk. This recipe makes two loaves.
Making the Dough
Dry ingredients: These can be combined ahead of time and stored in a large plastic container. When you’re ready to make the bread just dump them into a large mixing bowl.
Bread flour: 7 cups
Salt: 4 teaspoons
Wet ingredients: Combine these in a mason jar. They can be kept in the refrigerator for about a week.
Honey: 6 tablespoons.
Butter: 4 tablespoons.
Milk: 2 cups
Students put together the wet ingredients in the mason jars. The butter is sliced into smaller pieces and put in first (lower right), then the milk is added (left) and finally the honey (middle).
Microwave: Usually, we microwave the mason jar for about two minutes, which melts the butter nicely but gets the jar a little warmer than is good for the yeast. This is usually a good time to talk about density and stratification, because the honey sits at the bottom, the milk above it, and the butter floating at the top.
Cooling it down: So to make the yeast happy, we usually add some cold (tap) water to the mason jar with the other wet ingredients.
Water: two thirds (2/3) of a cup (cold from the tap).
Once everything is well mixed and the liquid mixture in the mason jar is at or just above body temperature, add the yeast.
Yeast: 4.5 teaspoons (which is equivalent to two of the small packets you buy from the store).
Yeast is much, much cheaper if you buy it in bulk. Even the small, 4 ounce jars at the supermarket are around $4, while a 1 pound bag is about $7. We get ours from Sam’s Club, and store the yeast we have not used yet in a mason jar in the refrigerator.
Stir the yeast in well. Don’t stress if there are still some small clumps.
Combine wet and dry: Dump the contents of the mason jar into the large mixing bowl with the dry ingredients. Do it quickly, otherwise the yeast will settle to the bottom of the jar and not all come out.
A hand shaped lake in a land of flour.
Now, kneed the dough. We usually use our hands and kneed in the mixing bowls. You may need to add a little more flour as you’re kneeding it if the dough is too sticky. Alternatively, you can add a bit of water if it’s too dry, but I’ve found it much easier to start with the dough too wet and add flour than doing it the other way around.
You can tell when the moisture is right, and the dough is ready, when it stops sticking to your fingers.
This dough seems a little too wet. They'll sprinkle a little flour on the top and kneed it in. When the dough is ready, it won't stick to your fingers. The last time I said something about their dough needing a bit of flour, the student told me that they knew very well and I should go away because I was just causing trouble. I consider this a success.
I’ve not had any student who was unable to manage the dough, but the quality of the end result depends on the amount of care and effort the students put into it. Unsurprisingly, the more tactile oriented students tend to produce some magnificent dough.
The kneeding is done, and the dough is ready to rise.
Rising and Baking
Once you have a nice dough, it needs to rise for about an hour, although we’ve found that 45 minutes works better since we prefer slightly smaller loaves. Drape a damp towel over it to keep it moist. Use a big enough towel, because if you’ve done everything right, and the yeast is happy, the dough should double in size.
If the dough is left too long it will expand to fill the entire bowl and begin to collapse in on itself.
After it’s risen, punch the dough down, split it into two, roll each piece into the shape of a loaf, and place them into loaf pans.
Now let it rise again for another hour, or 45 minutes in our case (don’t forget the damp towel).
After the second rise (in the pans), place the loaves into the oven at 350 degrees Fahrenheit for 45 minutes. It usually takes the ovens about 10 minutes to preheat to the correct temperature.
And then, you’re done. Enjoy.
Hot out of the oven, a loaf of bread with the school logo. We set an aluminum foil cutout of the logo on top of the bread while it was baking to imprint the shapes in the crust.
Time
Managed well the entire process can fit nicely into the afternoon schedule. We mixed and kneeded the bread during the half hour of Personal World just after lunch (around 12:30).
With the dry and wet ingredients already measured out ahead of time (once a week during the Student Run Business period) our expert bakers could kneed the dough and clean up after themselves in less than 15 minutes.
Then, all that’s left is to transfer the dough to the bread pans, which takes about 5 minutes (including washing up); put the bread in the ovens an hour later (1 minute); and then taking them out of the oven and washing the big mixing bowl (another 5 minutes). Timed right, the bread is finished just in time for everyone to get to their classroom jobs. It helps that everything, except the mixing bowls, can go into the dishwasher.


