Sulfur Hexafluoride Density Demonstration

Sulfur hexafluoride is transparent, so if you fill a fish tank with it you can’t really see that that tank’s filled with anything other than air. However, since sulfur hexafluoride is denser than air, you can float a light boat on the invisible gas for a cool demonstration of density.

Note: Air is about 80% nitrogen gas, which has the formula N2, and a molecular mass of 28 atomic mass units: the molecular mass is the sum of the atomic masses of all the atoms in a molecule. Sulfur hexaflouride has the formula SF6 and a molecular mass of 146 amu, making it about 5 times denser than air.

Alloys are (not Always) Stronger

Steel is an alloy of iron and other elements in small amounts. The exact proportions of the small amounts of other elements can make the alloy stronger, more flexible, and/or more resistant to rusting among other things. Similar alloying is used to make aluminum stronger. You’ll often hear the saying, “Alloys are Stronger” (often used as an argument for more diversity). There is a lot of fascinating research and discoveries happening in the fields of metallurgical arts and sciences at the moment. However, YouTube user NurdRage demonstrates with some gallium and an aluminum can, alloys are not always stronger.

Some People Just want to put Chemicals on Stuff to See it Burn

“We want to put chemicals on it and see what happens,” she said.

I was not quite sure how to respond. First of all, I didn’t know what “it” was. Secondly, I had no idea about what chemicals the three of them wanted to “put on it”. And thirdly, I was wondering why they even thought that students could just wander into the chemistry lab and get my permission to “put chemicals” on some random stuff, just to see what would happen.

For the last question, alas, I’m afraid to say that they may, perhaps, know me too well. However, given my visceral antipathy to inexact language — especially in a science lab where safety is always a concern — based on the first two questions, they don’t know me quite well enough.

An interrogation ensued.

“It” turned out to be two sad-looking pieces of dried apple. They weren’t dried when they’d been left in someone’s locker who knows how long ago, but they were pretty dessicated now.

The “chemicals”, on the other hand, they weren’t quite so sure about. Or at least they didn’t want to tell me right away. They may have had different ideas about what they wanted to see.

“We want to see it burn and smoke!” explained the second one happily. I didn’t have to express either skepticism or approbation verbally, my face responded automatically.

“We just want to see bubbles and stuff,” suggested the first one somewhat tentatively; eying my facial expression carefully.

The third one said nothing, but she tends to reticence. I looked at her inquiringly to give me a second to think.

That’s when I realized that they were all in chemistry together. They’ve been working with chemicals, studying different types of reactions for the last eight months, so they probably had at least some idea about what they were asking about.

The Montessori axiom is to follow the child, and here they were expressing an interest in chemistry. It was an ill-formed interest perhaps, but an interest non-the-less, so maybe there was something I could work with.

I needed a way to gauge just how serious they were about their project, and, at the same time, tie it back to what they’d been learning in class. Were they interested enough to puts some serious thought into it?

So I told them that, if they could tell me exactly what chemicals they wanted to use, and write the chemical equations to show what would happen, I’d let them do it.

They were on it.

The first thing was to figure out what was in the apples that could react. Well, the apples had come pre-sliced, and fresh in one of those small, clear, plastic bags. The first student, who was taking charge of the group, ducked out of the room to retrieve it from the garbage can across the hall.

I’d expected that the ingredient list to be very sparse. Ideally just the single word, “apples”, with maybe the type of apple listed if the packet labelers were feeling verbose. However, it turns out that those “fresh” slices needed something to keep them looking good and tasty. So these fresh apple slices appear to contain some amount of calcium carbonate. That was a chemical they knew.

Their first thought was a single replacement reaction. If they added potassium to it then the potassium would replace the calcium and they’d see something interesting. It took a few minutes, and a little nudging of the quiet one to help out with the charges, but eventually they wrote out and balanced the reaction:

2 K + CaCO3 –> K2CO3 + Ca

The problem is, I pointed out, there’s nothing in that reaction that would produce bubbles. I didn’t even want to bring up heat and the exothermic and endothermic reactions, nor the fact that potassium is a solid, as is the calcium carbonate, which would make getting them to react dramatically a little bit difficult. I didn’t even point out what would happen if the potassium came in contact with water (or even sodium), because I know Ms. Wilson is planning on doing that little demonstration in the near future.

So what reactions produce bubbles? This took some further thought. With a few dropped hints, they came up with acid-base reactions, particularly, the reaction between calcium carbonate and hydrochloric acid. I pretty much told them what the products would be, and, with a little more coaxing of the quiet one for help, they were able to balance the reaction.

CaCO3 + 2HCl–> CaCl2 + CO2 + H2O

Now they were finally good to go. Unfortunately, it was also time to go P.E.. And they’d managed to drop one of the apple pieces into a bucket of water that my calculus students had left lying around after their bottle draining experiment.

So I told them they could try it tomorrow. Unfortunately, tomorrow is the field trip, so they’ll have to do it the day after.

We’ll see how it goes.

What Happens When Two Black Holes Collide?

A student asked this question about black holes during a discussion, and I didn’t have a good answer. Now there’s this:

A study last year found unusually high levels of the isotope carbon-14 in ancient rings of Japanese cedar trees and a corresponding spike in beryllium-10 in Antarctic ice.

The readings were traced back to a point in AD 774 or 775, suggesting that during that period the Earth was hit by an intense burst of radiation, but researchers were initially unable to determine its cause.

Now a separate team of astronomers have suggested it could have been due to the collision of two compact stellar remnants such as black holes, neutron stars or white dwarfs.

— via The Weather Channel (2013): Black Hole Collision May Have Irradiated Earth in 8th Century.

From the original article:

While long [Gamma Ray Bursts (GRBs)] are caused by the core collapse of a very massive star, short GRBs are explained by the merger of two compact objects … [such as] a neutron star with either a black hole becoming a more massive black hole, or with another neutron star becoming either a relatively massive stable neutron star or otherwise a black hole.

— Hambaryan and Neuhäuser (2013): A Galactic short gamma-ray burst as cause for the 14C peak in AD 774/5 in

More info via The Telegraph, and the original article discussing the spike in carbon-14 in tree rings is here.

Improvisational War

Rebel catapult. Image by Tauseef Mustafa.

Fighting against a well armed military, the rebels in Syria have had to do a lot of improvisation. A basic knowledge of physics and chemistry has proven somewhat useful.

The Atlantic has a collection of photos of DIY (do it yourself) weapons, that includes catapults and sling-shots.

A rebel carries his home-made grenade. Youssef, 28 year old FSA fighter says: “my home made grenades, I am the only one in our Katiba able to build them, the guys like me for that, thats why I always carry them, for me and my comrades, its my mark and I want to leave one.”. Image by Sabastiano Piccolomini.

Sebastiano Tomada Piccolomini has a fascinating photo-essay in the New Republic showing the one item that members of one group of rebels considered as their most crucial weapon. These range from a radio, to a packet of cigarettes, to improvised grenades.

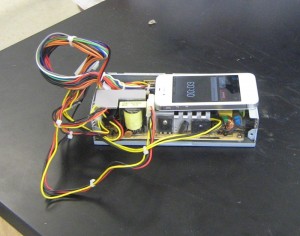
Finally, one of my students discovered that a cell phone and power-source from a computer can be made to look an awful lot like and improvised explosive device.

We are living in the future, but sometimes I wonder if it’s where we want to be.

Simulated IED.

Introducing Covalent Bonding

Covalent bonding happens when atoms share electrons, unlike with ionic bonding where one atom gives electrons to another.

Why do some combinations of atoms make ionic bonds and others covalent bonds? The answer has to do with electronegativity, which is the ability of atoms to attract electrons to themselves. Atoms that have similar abilities to attract electrons to themselves will likely form covalent bonds.

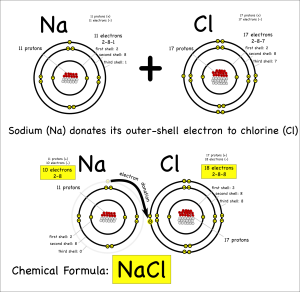
Sodium and chloride bond ionically when sodium donates an electron to chlorine.

For either type of bond, the atoms have the same objective. All atoms “want” filled outer electron shells. When sodium reacts with chlorine for example, sodium has one electron in its outer shell and chlorine is one short of a filled outer shell so it’s “easiest” for sodium to just donate its electron to chlorine to make them both happy.

However, when two similar atoms bond it’s often easier to share electrons.

Consider two hydrogens bonding covalently to form hydrogen gas (note: help on drawing atoms).

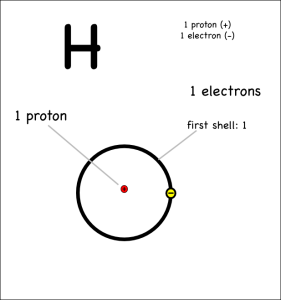
An hydrogen atom.

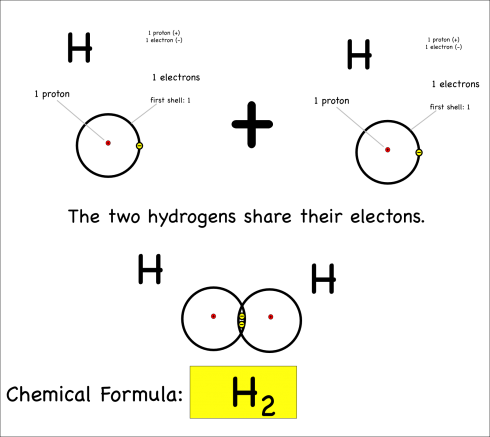
Each hydrogen has only one electron, and they both pull equally at the electrons so neither can give their electron away or take the other’s electron. Instead they share.

Two hydrogen atoms bond covalently by sharing electrons.

By sharing, they now each have two electrons in their outer shell, which is now full (since it’s the first shell), and both atoms are happy. This is covalent bonding.

The chemical reaction could be written as:

H + H –> H2

H2O

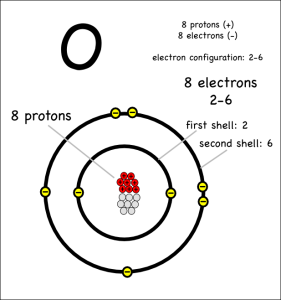
Now consider what happens when hydrogen atoms bond with oxygens. Oxygen atoms have 6 electrons in their outer shells, but they would like to have 8.

An oxygen atom.

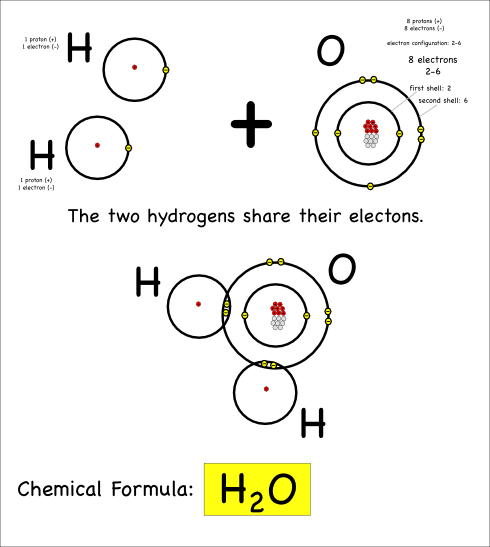
Oxygen atoms aren’t strong enough to take away the hydrogen electrons, so they share with covalent bonds. Each oxygen has to react with two hydrogens to get the two extra electrons it needs to end up with 8 electrons in its outer shell.

Bonding to form a water molecule.

Thus we create water, which has the chemical formula H2O, and the chemical reaction can be written:

2 H + O –> H2O

Drawing covalent molecules

Covalent molecules can be large and complex, in fact, one strand of your DNA will have somewhere around a billion atoms.

To make these easier to draw, you can represent each element by its symbol and each bond by a line. Remember, each covalent bond represents a pair of electrons that are shared.

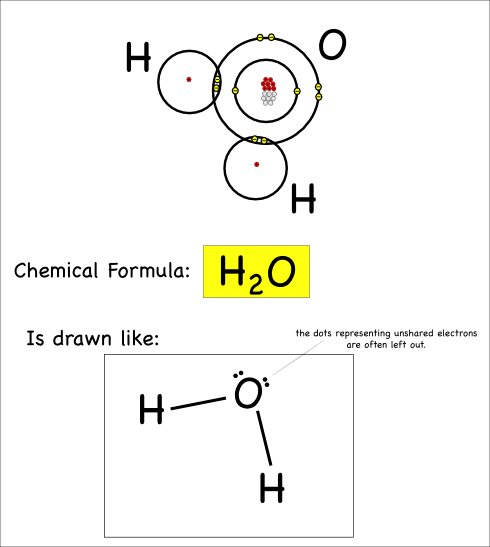
So our water molecule would be drawn like this:

Drawing a water molecule. The lower drawing is called a Lewis-Dot structure.

This is called a Lewis Dot structure. In addition to the lines showing the bonds, you’ll notice the dots that show the unbonded electrons: these dots are usually paired up.

Double Bonds

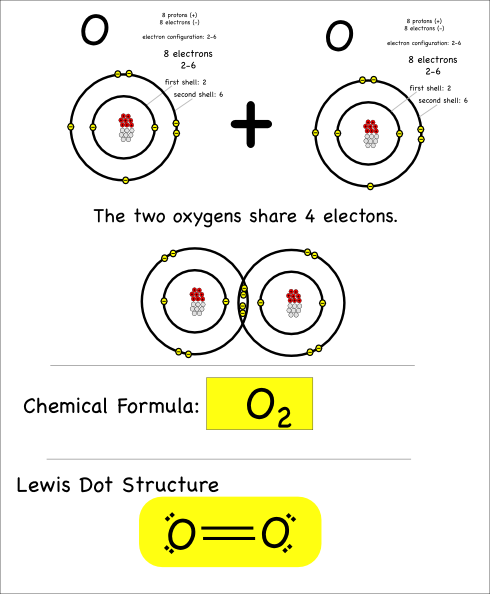
The last thing I’ll point out here is that atoms can share more than just one pair of electrons. When they share four electrons that means there are two bonds, which is referred to as a double bond.
Oxygen atoms bond with each other like this to make the oxygen gas we breathe.

Oxygen gas.

Practice

Now you can try drawing these covalent molecules:

  1. A molecule with one nitrogen atom and some hydrogen atoms (can you figure out how many hydrogens)
  2. A molecule with the chemical formula: CH4
  3. A molecule with the chemical formula: C2H6
  4. A molecule with the chemical formula: C3H8
  5. A molecule with the chemical formula: C2H4 (hint there’s a double bond)
  6. A carbon dioxide molecule, which has the chemical formula: CO2
  7. An ozone molecule, which has the chemical formula: O3
  8. An alcohol molecule, which has the chemical formula: CH3OH

An Introduction to Ionic Bonding

Now that we’ve learned how to draw individual atoms (and have an online reference for the first 20 elements), let’s consider ionic bonding.

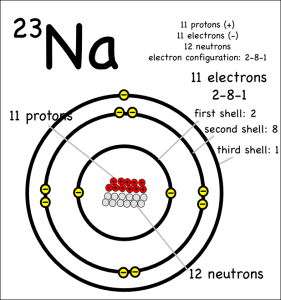
The key thing to remember is that atoms all “want” to have their outer electron shells filled. So while a sodium (symbol: Na) atom is happy* enough that it has the same number of protons and electrons (11 each) it could be happier if it got rid of the extra electron in it’s outer shell.

This sodium atom has one electron in its outer shell. It could be happier without it.

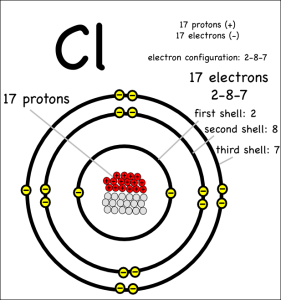
It can get rid of the electron by donating it to another atom that would be happier with an extra eletron. Something like chlorine (symbol: Cl) that only has 7 electrons in its outer shell, but wants to have 8.

Chlorine needs one more electron in its outer shell to be happy.

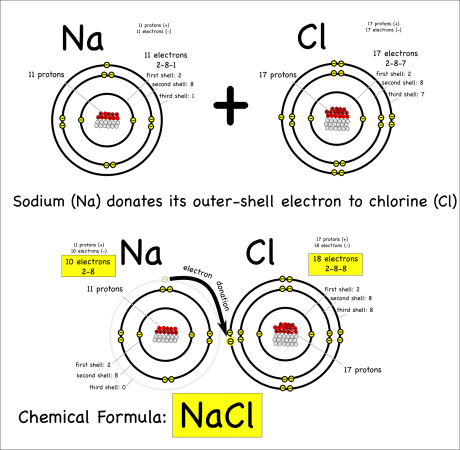
When one atom donates electrons to other atoms this creates a bond called an ionic bond. The molecule created is called an ionic molecule. In this case, sodium and chloride react to produce sodium chloride (chemical formula: NaCl).

Sodium and chloride bond ionically when sodium donates an electron to chlorine. This produces the ionic compound, sodium chloride (NaCl).

The chemical reaction can be written as:

Na + Cl –> NaCl

MgCl2

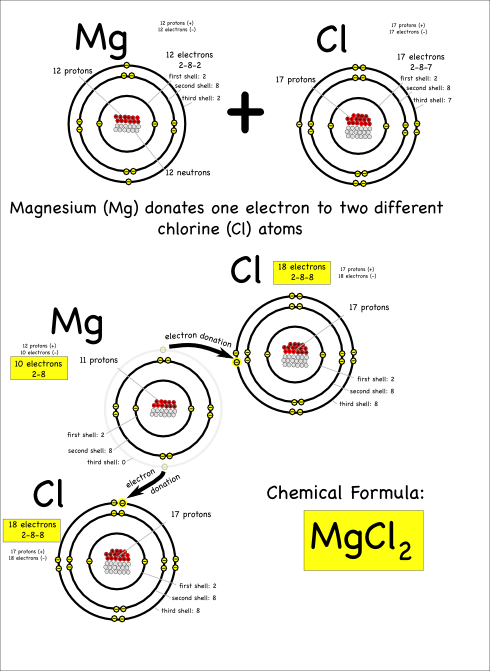
Now consider what happens when magnesium (symbol: Mg) reacts with chlorine.

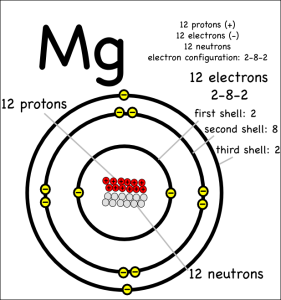
Magnesium has two electrons in its outer shell that it wants to get rid of.

A magnesium (Mg) atom, which has two electrons in its outer shell that it would like to, if possible, get rid of by bonding.

A single chlorine atom can’t take both, since chlorine only needs one electron to fill its outer electron shell. However, magnesium can give one electron to two different chlorine atoms to create a molecule with three atoms total.

Magnesium gives one electron to each of the two chlorines to create magnesium chlorine.

The resulting compound is called magnesium chloride, and is written as MgCl2. The subscripted 2 indicates that there are two chlorine atoms in each magnesium chloride molecule.

The chemical reaction can be written as:

Mg + 2 Cl –> MgCl2

Notice that each magnesium atom reacts with two chlorine atoms (Mg + 2 Cl) to produce a compound with one magnesium and two chlorines bonded together (chemical formula: MgCl2).

Practice

Now, for homework, you can try figuring out what is the chemical formula for the following ionic compounds:

  1. Potassium and Florine
  2. Beryllium and Chlorine
  3. Sodium and Oxygen
  4. Magnesium and Oxygen

Be sure to:

  • Draw the atoms that you will be reacting,
  • Show how the electrons are donated,
  • Write the chemical formula of the resulting compound,
  • Write the chemical reaction.

Good luck. Next we’ll try covalent bonding.

* Think of happiness as energy. Like people, atoms are happier to be in low energy states.

Notes

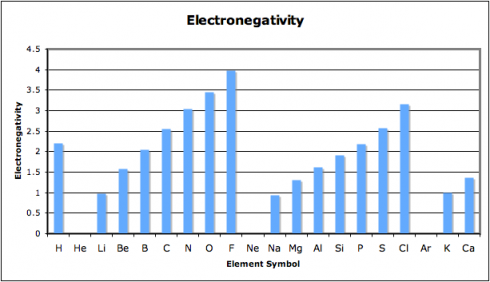
When we looked at the patterns in the periodic table, one of the things I had my student graph was the electronegativity. Electronegativity is the ability of atoms to attract electrons to themselves. You’ll note that chlorine’s electronegativity is high, while sodium’s is low.

The repeating pattern in electronegativity shows up quite well in the first 20 elements.

So chlorine will attract electrons to itself strongly, while sodium will not. This is why (more or less) sodium will end up donating its electron and why chlorine is happy to accept it.

When atoms with a large difference in electronegative bond together, the bonds tend to be ionic.

Electrolysis with Universal Indicator

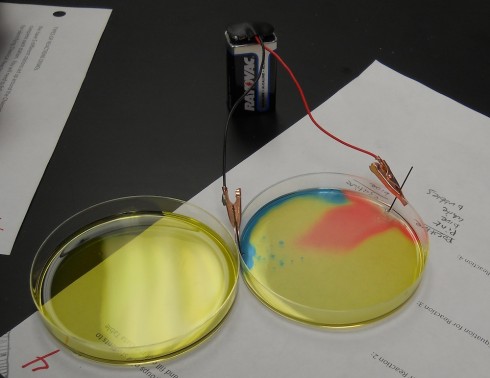
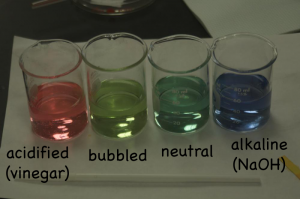
The universal pH indicator turns red for acids and blue for bases.

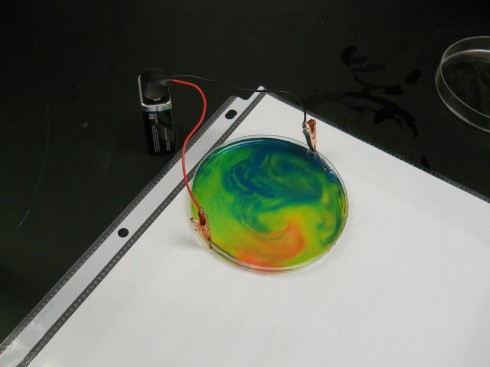
Ms. Wilson’s chemistry class did a beautiful electrolysis experiment by mixing a universal pH indicator into the salt solution. The indicator changes color based on how acidic or basic the solution is; we’ve used this behavior to show how blowing bubbles in water increases its acidity.

Changing colors of universal indicator show how blowing bubbles acidifies water (light green-second beaker) from neutral pH (dark green-third beaker) standard. For comparison, the first beaker (red) is acidified while the last beaker (blue) is made alkaline.

In this experiment, when electrodes (graphite pencil “leads”) are placed into salt (NaCl) water and connected to a battery, the sodium (Na) and chloride (Cl) split apart.

NaCl –> Na+ + Cl

The positive sodium ion (Na+) migrates toward the negative electrode, where it gets an electron and precipitates on the electrode as a plating. This is called electroplating and is done to give fake gold and silver jewelry a nice outward appearance.

Similarly, the water (H2O) also dissociates into hydrogen (H+) and hydroxide (OH) ions.

H2O –> H+ + OH

Hydrogen bubbles forming at the negative electrode.

The positive hydrogen ions (H+) go toward the negative electrode where they get an electron from the battery and are liberated as hydrogen gas (when they bond to another hydrogen you get H2 gas). However, releasing the positive hydrogen ion, leaves behind hydroxide ions in the area around the positive electrode.

The opposite happens at the positive electrode, with hydrogen ions left behind in the solution.

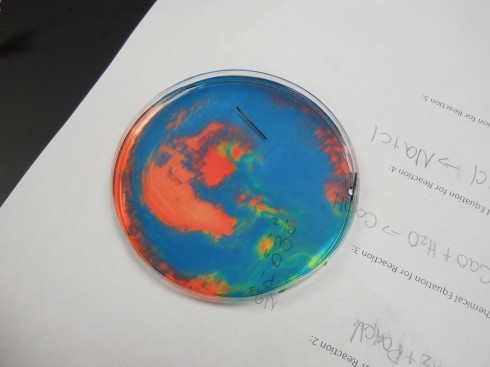
Since acidity is a measure of the excess of hydrogen ions in solution (H+), the left behind hydrogen ions make the solution near the positive electrode acidic, which turns the indicator solution red. The OH left near the negative electrode make the solution basic, which shows up as blue with the indicator.

If you gently shake the petri dish you end up with beautiful patterns like this:

Swirls.

And this:

After the electrodes have been disconnected.

Note: if the solution is mixed completely the hydrogen and hydroxide ions react with each other to make water again, the solution neutralizes, and becomes uniform again.

Note 2: This is an experiment that I should also do in physics. It should be interesting for students to see this experiment from two different perspectives to see how the subjects overlap.