Area of a Triangle

The area of a triangle is one half of the length of the base times the height:

 A = \frac{1}{2} \cdot b \cdot h

Six triangles with the same area.

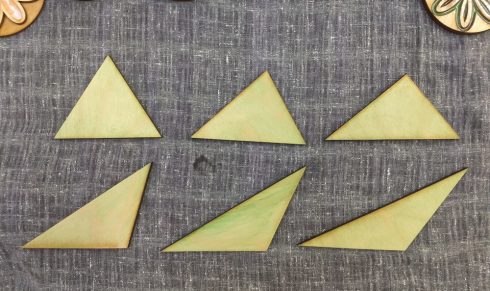
For my Geometry class, I made this set of six triangles to show that as long as the base and height are the same, all these triangles will have the same area.

Each student measured a triangle and found its area, which is a useful exercise in itself to get them to transfer the ideas and equations out of the book, and then the all compared their results. Their calculated areas were all within 5% of the actual value, which was not unexpected given that some small measurement error was inevitable.

Since you can use any side as the base, not everyone measured the equivalent side and height, so I had to demonstrate that similarity as I summed up the exercise.

For the next time I use this set, I’ve marked the one side that is 10 cm on each triangle for students to use as the base.

The Center of a Triangle

Laser-cut triangles showing the incenter, centroid, and circumcenter of an obtuse (slightly) triangle.

There are a few different ways of looking for the center of a triangle. My geometry students did the section in the textbook, then made cutouts on the laser.

They got some practice designing the triangles using a vector graphics program (Corel Draw). This did require an explanation of the difference between vector and raster images, since the majority of the class was unfamiliar with the concept. Raster images are made up of a grid of pixels, while vector images have instructions for where points go and where to draw lines. Vector images are great for diagrams like these because the files can be much smaller, the lines are more precise, and you can scale them up or down without losing any of that precision.

It turned out to be very useful to have them create the shapes and intersecting lines on the computer. It was pretty easy for them to precicely measure angles and find midpoints, so they could find the center points with much more accuracy than they could on just paper.

Having the final triangle cut-outs were also interesting. The centroid–the point of intersection of lines going from the vertices to their opposite side–is the center of gravity of the triangle, which means that, if you’re careful, you can use that point to balance the cut-out triangle on the tip of a pencil.

Atom Board: Montessori Work

Carbon-14 using the atom board.

These atom boards worked very well for practicing how to interpret atomic symbols. The protons (blue) and electrons (red) are magnetic so they snap into place quite satisfyingly. Their poles are oriented so that the electrons will only attach properly to the slots in the electron shells and the protons only attach the right way up to the nucleus. The neutrons are wooden and non-magnetic.

Procedure for Building an Atom

Nucleus

Step 1: Number of protons (+ charge).

  • The number of protons is given by the element name. Carbon will always have six protons, Hydrogen will have one proton. I have students memorize the first twenty elements in the correct order, so they can quickly determine the atomic (proton) number.
  • 14C: Protons = 6+

Step 2: Number of neutrons.

  • Neutrons = atomic mass – number of protons
  • The atomic mass is given at the top left corner of the atomic symbol: 14 in the example above for 14C.
  • 14C: Neutrons = 14 – 6 = 8

Electron Shells

Step 3: Number of electrons (- charge).

  • Electrons = number of protons – charge
  • The charge is given to the top right of the atomic symbol. In this case, there is no charge
  • 14C: Electrons = 6 + 0 = 6

Step 4: Electron Shells

  • Electrons go in shells around the nucleus.
  • Start with the smallest shell, fill it, and then add the next shell until you’ve placed all of the electrons.
  • The first shell can hold only 2 electrons, the second shell can hold 8, and the third 8. The electron configuration tells how many electrons are in each shell.
  • 14C: Electron configuration: 2-4

Building atoms with the atom board.

They’ve also turned out to be useful when explaining ionic bonding. Since it’s easy to add or remove electron shells, you can clearly show how many electrons can be donated or received to figure out how many atoms are involved in the reactions.