Managing cell phone usage at school is a tricky topic. We have some teachers who’d like to ban them outright, but we also have a growing number of parents who are expecting to be able to communicate with their kids–to organize pickups and carpooling during the day for example. The phones can be great for data-collection and documentation in classes, and a lot of my upper level math students prefer the Desmos app to using their graphical calculators.
Our current compromise is that middle schoolers have to leave their phones in the front office, where they can check them at lunch time or check them out if a teacher wants them to use them.
The high schoolers are allowed to keep their phones with them, but have to put them in a basket at the front of the classroom. Since they don’t like piling them into the basket, I experimented with the CNC machine to cut some plywood into a cell-phone shelf.
The shelf can hold about 30 phones, and I can easily see how many phones are on there from across the room, so I’d say this one worked out pretty well.
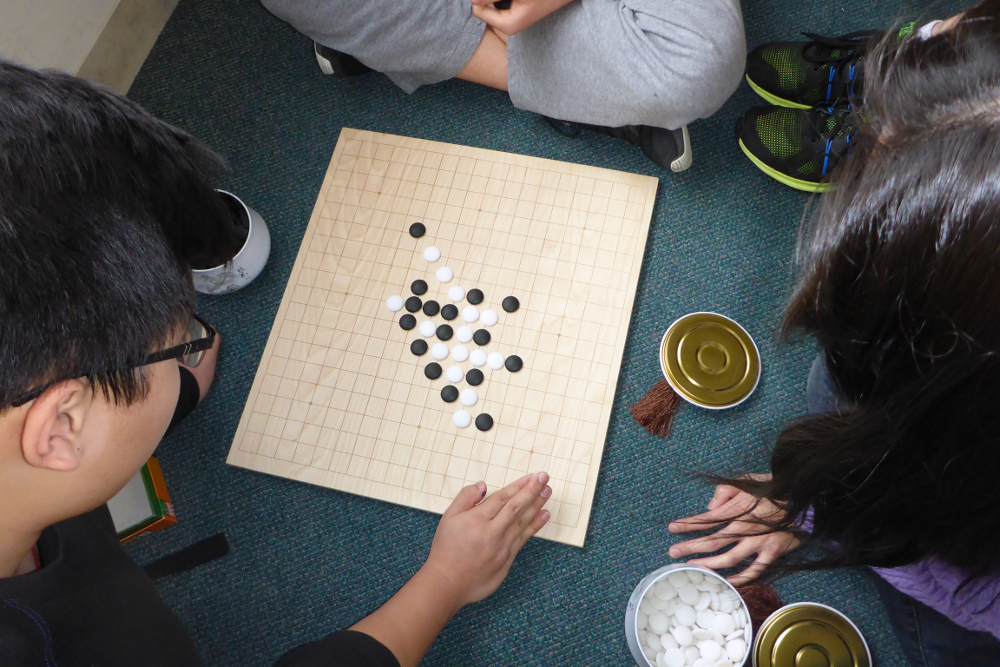
I recently discovered that, although they may look it, Go boards are not necessarily square. They’re slightly longer in one dimension so that the board looks more square to the players on both sides.
A student asked me to make one for him–he’d ordered a set recently and didn’t like the board it came with–so, I wrote a small python program to generate the Go grid, then lasered it onto a nice piece of sanded plywood.
It worked out quite well. Apparently the plywood makes just the right “thunk” sound when you put down the pieces.
Go board in use.
The script to generate the grid. go_board_2.py
from visual import *
from svgInator_3 import *

length = 424.2  #mm
width = 454.5   #mm
nLines = 19
dx = length/(nLines-1)
dy = width/(nLines-1)

print "Lenght = ", length
print "dx = ", dx

f = svgInator("go_board.svg")

lineStyle = {"stroke": "#000", "stroke-width": "2pt",}

#lines
for i in range(nLines):
    x = i * dx
    y = i * dy
    #vertical
    f.line(pos=[vector(x,0), vector(x,width)], style=lineStyle)
    #horizontal
    f.line(pos=[vector(0,y), vector(length,y)], style=lineStyle)

#circles
grid_pos = [(3,3), (3,9), (3,15),
            (9,3), (9,9), (9,15),
            (15,3), (15,9), (15,15)]

for i in grid_pos:
    (x, y) = (i[0]*dx, i[1]*dy)
    f.circle(pos=vector(x,y), radius=2.0,
             style={"stroke": "#000", "fill":"#000"})

#bounding box
f.rect(dim=vector(length,width), style=lineStyle)

f.close()
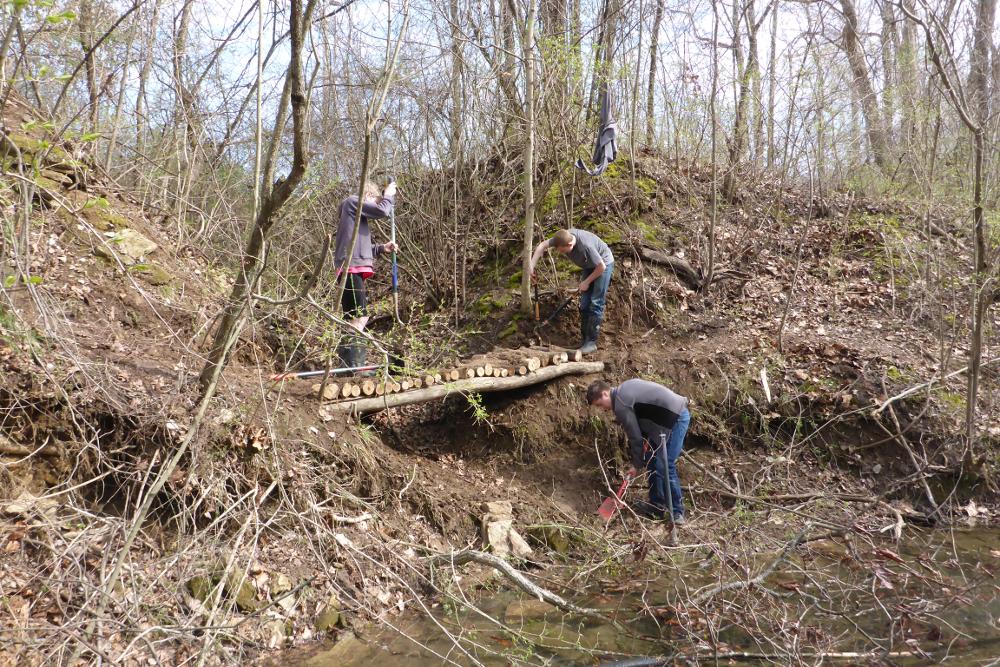
Inspired by a video of a temporary bridge built out in the woods for mountain biking, my students wanted to try building a “natural” bridge with no fasteners–no screws, no nails–over a small ravine that feeds into our creek.
The base of the bridge.
We found a couple large fallen logs to cut into two 10 foot lengths for the basic structural support for the bridge. These were dug into the ground to anchor them on either side of the ravine. We then chopped a couple more logs into 2 foot sections to go across the structural logs. The dense mud from the banks of the creek was then packed onto the top to hold it all together.
Packing mud.
In the end, the bridge turned out to be pretty solid, and definitely usable.
My crew from the Gaga Ball pit decided to make a trail through the woods and across the creek. So they built two short (12 ft long) bridges to cross the creek itself, and a third, “natural” log bridge to cross a small ravine that runs into the creek and cuts across the trail.
The short bridges were made of overlapping 2×4’s for structure (held together by 2.75 inch structural screws), with 24 inch long, 1×6 planks across the top.
Short bridge under construction.
The short bridges needed to be small and light enough to be moved when the creek rises, like it did today. I’ll attest that they can be moved, but not easily. They’re pretty heavy: it took a team of three or four middle schoolers to get it down to the creek, and it was hard going trying to drag it over to the side by myself this afternoon. Note to self: next time make sure the structural cross pieces are not at the very end of the bridge.
Say, for example, we have a furnace with an interior temperature of 1560 K (hot enough to melt copper) while the outside temperature is a balmy 300 K (27 Celcius). The wall of the furnace is 1 meter thick (it’s a big furnace). Can we figure out how the temperature changes inside the wall as goes from hot on the inside to cool on the outside?
Figure 1. Five nodes (points of interest) where we will calculate the heat flow through a furnace wall.
To start with, we’ll look at the temperature at five points (call them nodes): three are in the wall and two at the edges (see Figure 1). We’ll say the temperature at node 1 which is next to the furnace is T1, and the temperature at the outer edge of the wall is the 5th node (T5) so:
T1 = 1560 K
T5 = 300 K
Now we need to find the temperature at nodes 2, 3, and 4.
Heat Flow at Equilibrium
For each of the interior nodes, we can consider how things are at equilibrium. Heat is always moving through the wall, but as some point in time the heat flowing from the furnace into the wall will be equal to the heat flowing out of the wall, and for each node the heat flowing in will equal the heat flowing out.
The heat flow (Q) from one location to another is driven by the difference in temperature (ΔT): heat flows from high temperature to cooler temperatures (which makes ΔT negative). However, you also need to consider the distance the heat is traveling (Δx) since, given the same temperature drop, heat will flow faster if the distance is short. So, it’s best to consider the temperature gradient, which is how fast the temperature is changing over distance:
How fast heat flows is also mediated by the type of material (different materials have different thermal conductivities (K)), so our heat flow equation is given by the equation:
Consider Node 2
HEAT IN: Heat is flowing into Node 2 from Node 1, so:
HEAT OUT: Heat flows out to Node 3 so:
At equilibrium the heat into the node equals the heat out:
so:
Which we can simplify a lot because we’re assuming the thermal conductivity of the wall material is constant and we’ve (conveniently) made the spacing between our nodes (Δx) the same. Therefore:
And now we solve for temperature at T2 to get:
Finally, we can break the fraction into separate terms (we need to do this to make it easier to solve using matricies as you’ll see later) and start using decimals.
If we do the same for all the internal nodes we get:
You should be able to see here that the temperature at each node depends on the temperature of the nodes next to it, and we can’t directly solve this because we don’t know the temperatures of the interior nodes.
A System of Equations
Let’s collect all of our information to get a system of equations:
T1 = 1560 K
T2 = 0.5 T1 + 0.5 T3
T3 = 0.5 T2 + 0.5 T4
T4 = 0.5 T3 + 0.5 T5
T5 = 300 K
Now to rewrite this as a matrix. We start by putting all terms with variables on the left and all the constants on the right.
T1 = 1560 K
-0.5 T1 + T2 – 0.5 T3 = 0
-0.5 T2 + T3 – 0.5 T4 = 0
-0.5 T3 + T4 – 0.5 T5 = 0
T5 = 300 K
Now to matrixize:
This you can solve on paper, and, if you’d like, check your answer using Alex Shine’s Gaussian Elimination solver, which gives step by step output (although it’s a little hard to follow). I used Alex’s solver to get the result:
This problem is set up to be easy to check because the results should be linear (if you plot temperature versus distance through the wall you’ll get a straight line). It will also give you whole number results up to 10 nodes.
Next Steps
Any Number of Nodes
This procedure for setting up the matrix give the same basic equations no matter how many nodes you use, because as long as the distance between the nodes (Δx) and the thermal conductivity (K) are constant, the equation for each internal node (Ti) will be:
[math] T_i = \frac{T_{i-1} + T_{i+1}}{2}
and the matrix will continue to just have three terms along the diagonal.
Non-uniform Wall and Non-uniform Node Spacing
If the wall is not uniform then the thermal conductivity coefficient does not just drop out of the equation, so you’ll have to pay attention to the conductivity going into and out of each node. Same goes with the node spacing.
Alternative Solution Methods
Students could try:
writing their own matrix solvers.
setting up the system of equations in a spreadsheet program (they’ll need to change your program’s settings so that it uses its iterative solver).
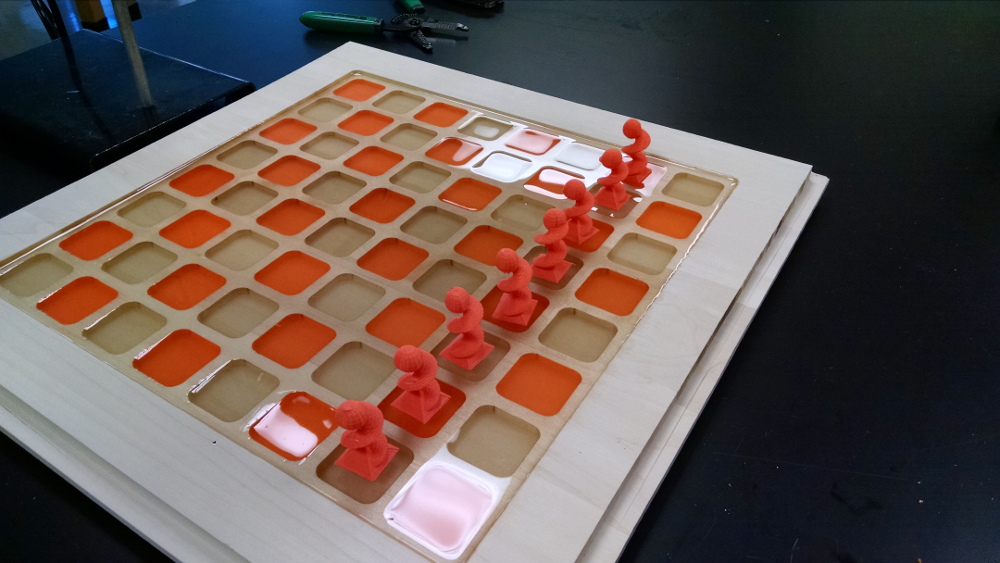
I used the computer controlled (CNC) Shopbot machine at the Techshop to drill out 64 square pockets in the shape of a chessboard. One of my students (Kathryn) designed and printed the pieces as part of an extra credit project for her Geometry class.
The pockets were then filled with a clear eqoxy to give a liquid effect. However, I mixed in two colors of pigmented powder to make the checkerboard. The powder was uv reactive so it fluoresces under black (ultra-violet) light.
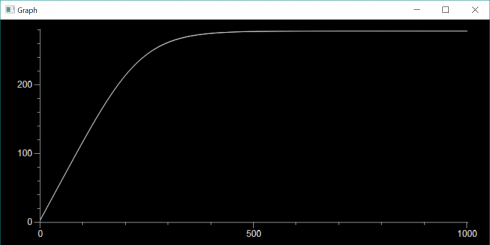
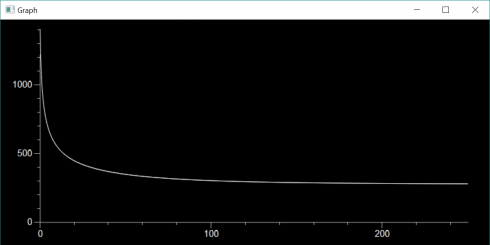
Temperature change over time (in thousands of years). As the Earth warms from 3K to equilibrium.
If the Earth behaved as a perfect black body and absorbed all incoming solar radiation (and radiated with 100% emissivity) the we calculated that the average surface temperature would be about 7 degrees Celsius above freezing (279 K). Keeping with this simplification we can think about how the Earth’s temperature could change with time if it was not at equilibrium.
If the Earth started off at the universe’s background temperature of about 3K, how long would it take to get up to the equilibrium temperature?
Using the same equations for incoming solar radiation (Ein) and energy radiated from the Earth (Eout):
At equilibrium the energy in is equal to the energy out, but if the temperature is 3K instead of 279K the outgoing radiation is going to be a lot less than at equilibrium. This means that there will be more incoming energy than outgoing energy and that energy imbalance will raise the temperature of the Earth. The energy imbalance (ΔE) would be:
All these energies are in Watts, which as we’ll recall are equivalent to Joules/second. In order to change the temperature of the Earth, we’ll need to know the specific heat capacity (cE) of the planet (how much heat is required to raise the temperature by one Kelvin per unit mass) and the mass of the planet. We’ll approximate the entire planet’s heat capacity with that of one of the most common rocks, granite. The mass of the Earth (mE) we can get from NASA:
cE = 800 J/kg/K
mE = 5.9723×1024kg
So looking at the units we can figure out the the change in temperature (ΔT) is:
Where Δt is the time step we’re considering.
Now we can write a little program to model the change in temperature over time:
EnergyBalance.py
from visual import *
from visual.graph import *

I = 1367.
r_E = 6.371E6
c_E = 800.
m_E = 5.9723E24

sigma = 5.67E-8

T = 3                               # initial temperature

yr = 60*60*24*365.25
dt = yr * 100
end_time = yr * 1000000
nsteps = int(end_time/dt)

Tgraph = gcurve()

for i in range(nsteps):
    t = i*dt
    E_in = I * pi * r_E**2
    E_out = sigma * (T**4) * 4 * pi * r_E**2
    dE = E_in - E_out
    dT = dE * dt / (c_E * m_E)
    T += dT
    Tgraph.plot(pos=(t/yr/1000,T))
    if i%10 == 0:
        print t/yr, T
        rate(60)
The results of this simulation are shown at the top of this post.
What if we changed the initial temperature from really cold to really hot? When the Earth formed from the accretionary disk of the solar nebula the surface was initially molten. Let’s assume the temperature was that of molten granite (about 1500K).
Cooling if the Earth started off molten (1500K). Note that this simulation only runs for 250,000 years, while the warming simulation (top of page) runs for 1,000,000 years.
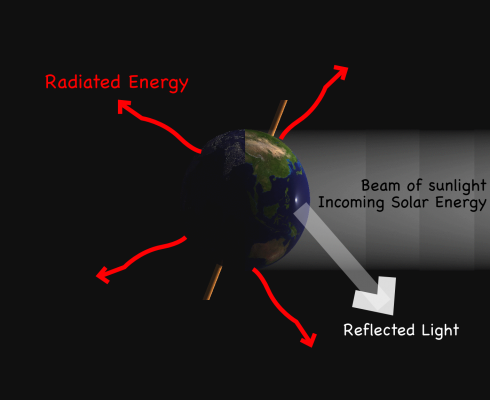
For conservation of energy, the short-wave solar energy absorbed by the Earth equals the long-wave outgoing radiation.
Energy and matter can’t just disappear. Energy can change from one form to another. As a thrown ball moves upwards, its kinetic energy of motion is converted to potential energy due to gravity. So we can better understand systems by studying how energy (and matter) are conserved.
Energy Balance for the Earth
Let’s start by considering the Earth as a simple system, a sphere that takes energy in from the Sun and radiates energy off into space.
Incoming Energy
At the Earth’s distance from the Sun, the incoming radiation, called insolation, is 1367 W/m2. The total energy (wattage) that hits the Earth (Ein) is the insolation (I) times the area the solar radiation hits, which is the area a cross section of the Earth (Acx).
Given the Earth’s radius (rE) and the area of a circle, this becomes:
Outgoing Energy
The energy radiated from the Earth is can be calculated if we assume that the Earth is a perfect black body–a perfect absorber and radiatior of Energy (we’ve already been making this assumption with the incoming energy calculation). In this case the energy radiated from the planet (Eout) is proportional to the fourth power of the temperature (T) and the surface area that is radiated, which in this case is the total surface area of the Earth (Asurface):
The proportionality constant (σ) is: σ = 5.67 x 10⁻⁸ W m-2 K-4
Note that since σ has units of Kelvin then your temperature needs to be in Kelvin as well.
Putting in the area of a sphere we get:
Balancing Energy
Now, if the energy in balances with the energy out we are at equilibrium. So we put the equations together:
cancelling terms on both sides of the equation gives:
and solving for the temperature produces:
Plugging in the numbers gives an equilibrium temperature for the Earth as:
T = 278.6 K
Since the freezing point of water is 273K, this temperature is a bit cold (and we haven’t even considered the fact that the Earth reflects about 30% of the incoming solar radiation back into space). But that’s the topic of another post.