A Study in Linear Equations

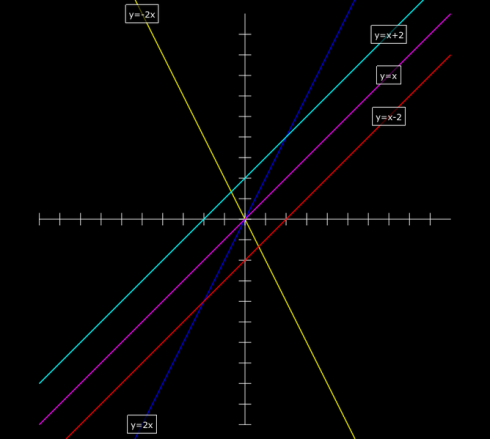
The effects of changing the constants in the equation of a line (y=mx+b). Image by Tess R.

My high school pre-Calculus class is studying the subject using a graphical approach. Since we’re half-way through the year I thought it would be useful to introduce some programming by building their own graphical calculators using Vpython.

Now, they all have graphical calculators, and Vpython does have its own graphing capabilities, but they’re fairly simple, only 2-dimensional, and way too automatic, so I prefer to have students program the calculators in full 3d space.

My approach to graphing is fairly simple too, but its nice because it introduces:

  • Co-ordinates: Primarily in 2d (co-ordinate plane), but 3d is easy;
  • Lists: in this case its a list of coordinates on a line;
  • Loops: (specifically for loops) to repeat actions and produce a sequence of numbers (with range); and
  • A sideways glance at matrix-like operations with arrays: A list of numbers can be treated like a matrix in some relatively simple circumstances. However, it’s not real matrix operations: multiplying a scalar by a list works like real matrix multiplication, but multiplying two lists multiplies the corresponding elements in the list.

A Simple Graphing Program

Start the program with the standard vpython header:

from visual import *

x and y axes: curves and lists

Next create the x and y axes. This introduces the curve object and lists, because Vpython draws its curve from a series of points held in a list.

To keep things simple, we’re letting the graph go from -10 to positive 10 along both axes, which makes the x-axis a line segment with only two points:

line_segment = [(-10,0), (10,0)]

The square brackets say that what’s inside as a list. In this case it’s a list of two coordinate pairs, (-10,0) and (10,0).

Now we create a line using Vpython’s curve and tell it that the positions of the points on the curve are the ones we just defined:

xaxis = curve(pos=line_segment)

To create the y-axis, we do the same thing but change the coordinate pair to (0,-10) and (0,10).

line_segment = [(0,-10),(0,10)]
yaxis = curve(pos=line_segment)

Which should produce:
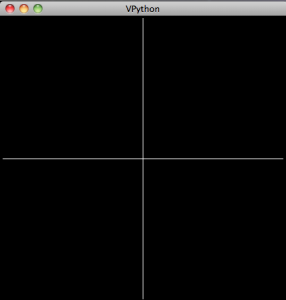
Very simple x and y axes.

Tic-marks: loops

In order to be better able to keep track of things, we’ll need some tic-marks on the axes. Ideally we’d like to label them too, but I think it works well enough to save that for later.

I start by having students create the first few tic-marks and then look for the emerging pattern. Their first attempts usually look something like this:

mark1 = curve(pos=[(-10,0.3),(-10,-0.3)])
mark2 = curve(pos=[(-9,0.3),(-9,-0.3)])
mark3 = curve(pos=[(-8,0.3),(-8,-0.3)])
mark4 = curve(pos=[(-7,0.3),(-7,-0.3)])
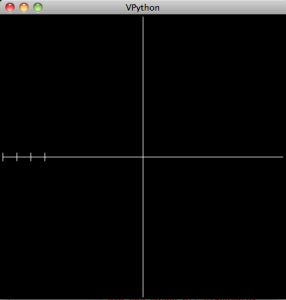
A few tic marks.

However, instead of tediously writing out these lines we can automate it by noticing that the only things that change are the x-coordinate of the coordinate pairs: they go from -10, to -9, to -8 etc.

So we want to produce a set of numbers that go from -10 to 10, in increments of 1, and use those number to make the tic-marks. The range function will do just that: specifically, range(-10,10,1). Actually, this list only goes up to 9, but that’s okay for now.

We tell the program to go through each item in the list and give its value to the variable i using a for loop:

for i in range(-10,10,1):
    mark = curve(pos=[(i,0.3),(i,-0.3)])

In python, everything indented after the for statement is within the loop.
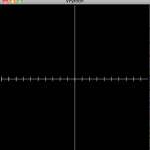
Tic marks on the x-axis.

The y-axis’ tic-marks are similar, and its a nice little challenge for students to figure them out. They usually come up with a separate loop, eventually, that looks something like:

for i in range(-10,10,1):
    mark = curve(pos=[(0.3, i),(-0.3,i)])
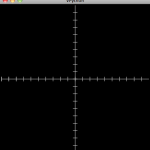
Our axes.

The Curve

Now to create a line we really only need two points. However, so that we can make other types of curves later on we’ll create a line with a series of points. We’ll create the x and y values separately:

First we set up the set of x values:

line = curve(x=arange(-10,10,0.1))

Note that I use the arange function which is just like the range function but gives you decimal values (so you can do fractions) instead of just integers.

Next we set the y values that go with the x values for the equation (in this example):
! y = 0.5 x + 2

line.y = 0.5 * line.x + 2

Finally, to make it look better, we change the color of the line to yellow:

line.color = color.yellow

In Summary

The final code looks like:

from visual import *


line_segment = [(-10,0),(10,0)]
xaxis = curve(pos=line_segment)

line_segment = [(0,-10),(0,10)]
yaxis = curve(pos=line_segment)

mark1 = curve(pos=[(-10,0.3),(-10,-0.3)])
mark2 = curve(pos=[(-9,0.3),(-9,-0.3)])
mark3 = curve(pos=[(-8,0.3),(-8,-0.3)])
mark4 = curve(pos=[(-7,0.3),(-7,-0.3)])

for i in range(-10,10,1):
    mark = curve(pos=[(i,0.3),(i,-0.3)])

for i in range(-10,10,1):
    mark = curve(pos=[(0.3, i),(-0.3,i)])


line = curve(x=arange(-10,10,0.1))
line.y = 0.5 * line.x + 2
line.color = color.yellow

which produces:
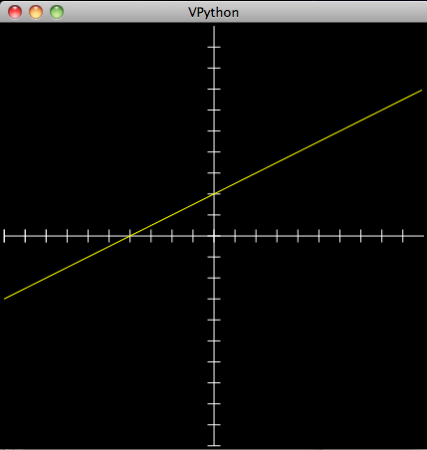
A first line: y=0.5x+2

Note on lists, arrays and matrices: You’ll notice that we create the curve, give it a list of x values (using arange), and then calculate the corresponding y values using matrix multiplication: 0.5 * line.x. This works because line.x actually stores the values as an an array, not as a list. The key difference between lists and arrays, as far as we’re concerned, is that we can get away with this type of multiplication with an array and not a list. However, an array is not a matrix, as is clearly demonstrated by the second part of the command where 2 is added to the result of the multiplication. In this case, 2 is added to each value in the array; if it were an actual matrix you need to add another matrix of the same shape that’s filled with 2’s. Right now, this is invisible to the students. The line of code makes sense. The concern is that when they do start working with matrices there might be some confusion. So watch out.

And to make any other function you just need to adjust the final line. So a parabola:
! y = x^2
would be:

line.y = line.x**2

(The two stars “**” indicates an exponent).

An Assignment

So, to assess learning, and to review the different functions we’ve learned, I asked students to produce “studies” of the different curves by demonstrating what happens when you change the different constants and coefficients in the equation.

For a straight line the general equation is:
! y = mx + b

you what happens when:

  • m > 1;
  • 0 < m < 1;
  • m < 0

and:

  • b > 1;
  • 0 < b < 1;
  • b < 0

The result is, after you add some labels, looks something like the image at the very top of this post.

This type of exercise can be done for polynomials, exponential, trigonometric, and almost any other type of functions.
Projectile Motion

Abstract

A series of still photographs of a projectile (soccer ball) in motion were used to determine the equation for the height of the ball (h(t) = 4.9 t2 + 14.2 t + 1.25), the initial velocity of the ball (14.2 m), the maximum height of the ball (11.6 m), and the time between each photograph (0.41 s). The problem was solved numerically using MS Excel’s Solver function. There are much easier ways of doing this, which we did not do.

Introduction

Figure 1. Calculated elevation of the soccer ball after launch.
Figure 2. Animation of the soccer ball projectile.

One of physics lab assignments I gave my students was to see if students could use a camera to capture a sequence of images of a projectile, plot the elevation of the projectile from the photographs, determine the constants in the parabolic equation for the height of the projectile, and, in so doing, determine the velocity at which the projectile was launched.

I offered my old, digital Pentax SLR that can take up to seven pictures in quick sequence and be set to fully manual. A digital video camera with a detailed timestamp would have been ideal, but we did not have one available at the time.

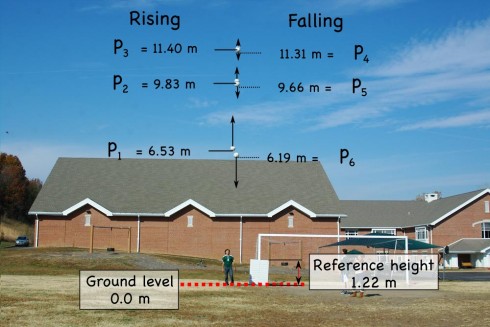
Now the easy way of getting the velocity data would be to estimate the heights (h) of the ball from the image using some sort of known reference (in this case the whiteboard), and determine the time between each photograph (Δt) by photographing a stopwatch using the same shutterspeed settings. After all, the average velocity of the ball between two images would be:

! \bar{v} = \frac{\Delta h}{\Delta t}

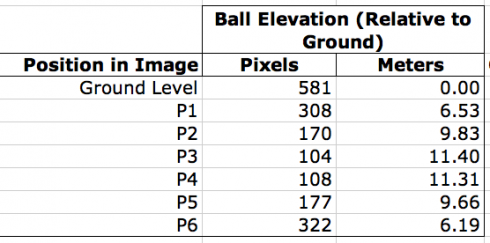
The reference whiteboard is four feet tall (1.22 m) in real life, but 51 pixels tall in the image. Using this ratio (i.e. 1.22 m = 51 px) we can convert the heights of the ball from pixels to meters:

Table 1. Table showing the conversion of the height of the ball in pixels to elevation (in meters).

Unfortunately, I think my students forgot to do the pictures of the stopwatch to get Δt, the time between each photograph. Since the lab reports are due on Monday, and it’s the weekend now I’m curious to see what they come up with.

However, I was wondering if they could use just the elevation data to back out the Δt. So I gave it a try myself. Even the easiest way of solving this problem is not trivial, in fact, I ended up resorting to Excel’s iterative solver to find the answers. While this procedure probably goes a little beyond what I expect from the typical high school physics student, more advanced students who are taking calculus might benefit.

Procedure

We took the reference whiteboard (1.21 m tall), a soccer ball, and the camera outside. The whiteboard was leant vertically against the post of the soccer goal. The ball was thrown vertically by a student standing next to the whiteboard (see Figure 1) while pictures were taken. The camera’s shutterspeed was 1/250th of a second. The distance from the camera to the person throwing the ball (and to the whiteboard) were not measured.

The procedure was repeated several times, but only one trail was used in this analysis.

The images were loaded onto a computer, and the program GIMP was used to determine the distance, in pixels, from the ground to the projectile. The size of the reference whiteboard, in pixels, was used to calculate the height of the soccer ball in meters.

The elevations measured off the photographs were then used to calculate the release velocity, time between snapshots, and maximum height of the ball.

The Equation for Elevation

I started with the fact that once the ball is released, the only force acting on it is the force of gravity. Since the mass of the ball does not change we only have to consider the acceleration due to gravity (-9.8 m/s2). I also neglect air resistance to make things easier.

Finding the Velocity Equation

Start with the fact that, acceleration is the rate of change of velocity with time. You can write it in the differential form:

! a = \frac{dv}{dt} = -9.8

so we integrate with respect to time to get the equation for velocity as a function of time:

! v(t) = \int -9.8 dt

! v(t) = -9.8 t + c

where c is an unknown constant. What we do know though, is that at the beginning, when the ball is just launched, time is zero (t = 0) so cv becomes the initial velocity (v0) at which the ball is thrown:

at t = 0, v(0) = v0:
! v_0 = -9.8 (0) + c

! v_0 = c

So our velocity equation becomes:

! v(t) = -9.8 t + v_0

Finding the height equation

Now since we know that velocity is the rate of change of distance (in this case height) with time:

! v(t) = \frac{dh}{dt} = -9.8 t + v_0

so we integrate again to find the height equation:

! \frac{dh}{dt} = -9.8 t + v_0
! h(t) = \int (-9.8 t + v_0) dt
! h(t) = \frac{-9.8 t^2}{2} + v_0 t + c

Similar to what we did with the velocity equation, to find the new constant c we consider what happens at the start time, when the ball is launched, and t = 0 and h(0) = h0;

! h_0 = \frac{-9.8 (0)^2}{2} + v_0 (0) + c

so:
! h_0 = c

The constant is equal to the initial height of the ball — the height of the ball when it’s thrown. So we end up with the final equation:

! h(t) = \frac{-9.8 t^2}{2} + v_0 t + h_0

Results

Solving all the unknowns

At this point, although we have an equation for the height of the ball, we don’t know the initial velocity (v0), nor do we know the initial height of the ball when it’s released (h0). And we still don’t know the time when the ball is at each position.

With that many unknowns we’d need the same number of independent equations to be able to solve for them all. It may be possible, but instead of analytically solving the equations I opted to take a numerical approach, and use Excel’s Solver function.

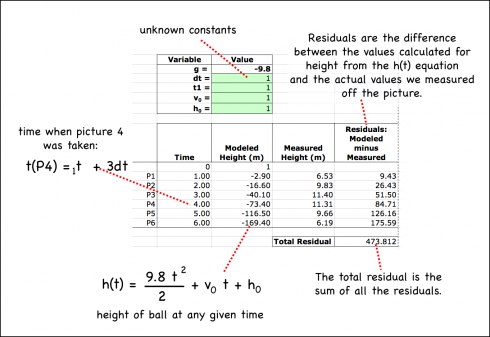
I started by setting up the equations to calculate the height of the ball at six different times to correspond with our six height measurements. It was necessary therefore to create a set of variables:

  • Time when we started taking pictures (t1): Since we don’t know how long after we threw the ball we started taking pictures, I made this a variable called t1.
  • The time between each picture (dt): I made the assumption that the time between each picture would be constant. The shutter speed was constant (1/250th of a second) so there is no obvious reason why the time should be different.
  • Initial velocity (v0): The initial upward speed at which the ball was thrown. Obviously, the faster the initial speed the higher the ball goes, so this is a fairly important parameter.
  • Initial height (h0): We also don’t precisely know how high the ball was when it was released, so this also needs to be a variable.

By defining the time between each picture as dt, we can write the time that each picture was taken in terms of the time of the initial picture (t1) and dt. After all the second picture would have been taken dt seconds after the first for a total time of:

! t(P2) = t_0 + dt

similarly for all the pictures:

Table 2. Table of expressions giving the time when each of the six photos were taken.

Now I set up an Excel spreadsheet and gave all the unknown variable values and initial value of 1:

Table 3. Table in Excel for determining the height of a projectile. All of the unknown variables' values are highlighted in green and have been given an initial value of 1.

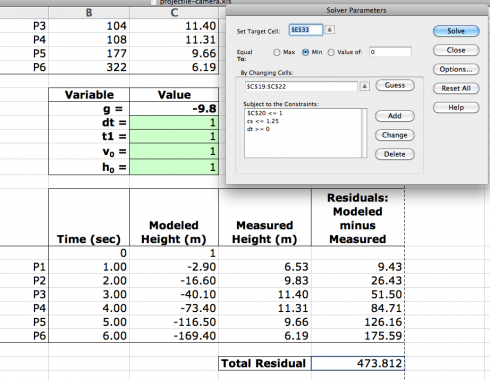
Now I just had to run Solver and tell it that I wanted the Total Residual, which gives the difference between the h(1) equation’s values for height and the actual, measured values, to be as close to zero as possible. A perfect fit of the equation to the data would have a total residual of one, but that’s not possible when you’re dealing with real data.

Table 4. Parameters set in Solver to determine the values of the unknown constants.

Even so, I had to goose Solver a bit for it to produce reasonable numbers. I put in a few constraints:

  • dt >= 0: We could not have a negative time between pictures.
  • h0 <= 1.25: 1.25 meters seemed reasonable for the height at which the ball was released.
  • t1 <= 1: It also seemed reasonable that the time when the first picture was taken was less than one second after the ball was thrown.

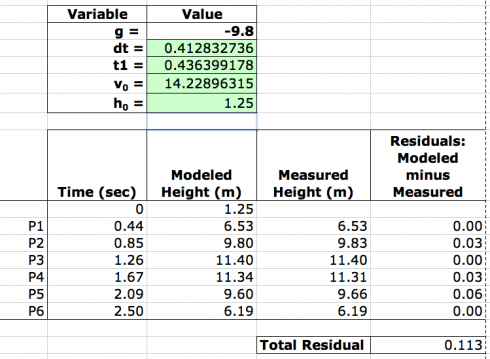
I ran the Solver a few times, and had to reset dt to 0.5 at one point when it had become zero, but the final result looked remarkably good: the total difference between the modeled line and the actual data was only 0.113 meters.

Table 5. Solver's solution for the unknown constants in the height equation.

So we found that:

  • Initial velocity: v0 = 14.2 m/s
  • Height at release: h0 = 1.25 m
  • Time between pictures: dt = 0.41 s
  • Time when the first picture was taken: t1 = 0.44 s

Which makes the height equation:

! h(t) = \frac{-9.8 t^2}{2} + 14.2 t + 1.25

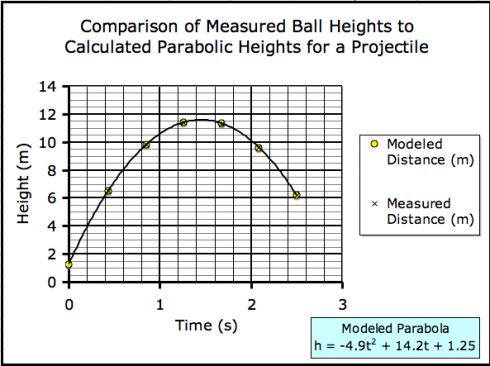
Using these constants in the height equation, we could see how good fit the height equation was to the data:

Figure 3. Graph comparing the modeled heights (from the h(t) equation) to the actual data.

Maximum Height of the Ball

Finally, the maximum height of the ball can be read off the graph, but it can also be determined using the equation for the height of the ball:

! h(t) = \frac{-9.8 t^2}{2} + v_0 t + h_0

We know that the maximum height is reached when the ball stops moving upward and starts to descend. At that point, the vertical velocity of the ball is zero. Since the velocity of the ball is the rate of change of height ( v = \frac{dh}{dt} ) we can differentiate the height equation to get an equation for velocity.

! h(t) = \frac{-9.8 t^2}{2} + v_0 t + h_0

! v = \frac{dh}{dt} = -9.8 t + v_0

since we’ve determined that the initial velocity of the ball is 14.2 m/s we get:

! v = -9.8 t + 14.2

when the velocity is zero (v = 0):

! 0 = -9.8 t + 14.2

which can be solved for t to find that the time the ball reaches it’s maximum height is:

! t = 1.45 seconds

Putting this into the height equation:

! h(1.45) = \frac{-9.8 (1.45)^2}{2} + 14.2 (1.45) + 1.25

gives:

! h_{max} = 11.58 meters

Discussion

I’m quite happy with the way this project turned out. The fit between the modeled heights (h(t)) and the actual heights was very good.

My primary concern going into the project was that the distortion from the camera lens would make this technique impossible, but that appears not to be a significant problem.

Most of this calculation, including the somewhat tricky numerical solution using Solver could have been avoided if I’d calibrated the camera, simply by pointing it at a stopwatch (using the same shutterspeed as in the experiment) and measuring the time between snapshots. It will therefore be interesting to see if the actual time between shots (dt) is close to the dt of 0.41 seconds calculated by the model.

Finally, as noted above, a video camera with a timestamp would possibly be a more useful technology for this experiment.

Conclusion

It is possible to analyze the projectile path of an object using a series of snapshots, to determine the initial velocity of the projectile, its release height, and the time between snapshots, if you can assume that the time between snapshots is identical. There are, however, much easier methods of solving this problem.

References

None, but this is where they’d be if I had any.

Appendix

The Excel spreadsheet where all the calculations were done is here.