Wooden Spoons (and other Cutlery)

Oiled cedar spoon.

Of the trees that were blown over in March’s storm, one was a beautiful old cedar, which, based on the ring count, was over 60 years old. The team clearing the downed wood and brush were kind enough to help secure some of the wood for the Makerspace.

One afternoon, a couple weeks ago, we lost wifi, and it just so happened that I’d recently found a set of small carving chisels on sale, so I suggested to a couple of the bereft students wondering around the lab that maybe they’d like to try doing something purely by hand–like carving spoons. To my utter amazement they were all in. And it snowballed from there. Right now I think 75% of my students are making some type of spoon or wooden cutlery.

It helps that the cedar wood has the characteristic gorgeous red and white banding.

Most of the spoons and spatulas thus far have been hand carved. Seeing the students’ sustained interest in woodworking, I decided to pick up a nice set of carving tools that included a hook for excavating the bowls of spoons.

Student carving the bowl of a spoon.

I have to thank Mr. Seddon for his advice on tools and working with wood that has not been fully dried, aka green woodworking. I had not even heard of green woodworking before, but it has a long history, and a little research directed me on to things like the fully manual pole lathe (I’ve been wanting a lathe in the Makerspace for a while, so I may try to build one this summer).

Woodworking with green wood and hand tools requires close attention to the shape and structure of the wood. Chiseling with the grain is much easier than working against it. Knots can provide elegant features in the handle or bowl of a spoon, but are hard, and much more challenging to carve. Thus certain artistic choices did lead to discussions about woodcarving and metaphors for life.

While most of the work has been done by hand, it would not have been the Makerspace if we hadn’t experimented with some of the computer-controlled machines. One student used the CNC to cut spoon blanks of their own digital design. They were able to just do the outlines of the blanks, since we’re still trying to figure out how to carve objects with three-dimensional relief on our machine. Coach Lancaster suggested we use the laser to etch a tornado on all the pieces as a hat-tip to their provenance, so I’m trying to get a student to make us a simple design.

Cutting a spoon blank on the CNC.

We do have other plans for the rest of the wood that we salvaged. For one thing, I’ve been cutting slabs using a chainsaw. It still has a lot of moisture, and will take some time to dry (a few years it we leave it to air dry), but that will be necessary for some of our bigger, future projects. However, it has been nice to be able to start putting the unfortunate felling of the trees to good use. 

Spatula.

Culturing Yeast: Baking Bread in Biology

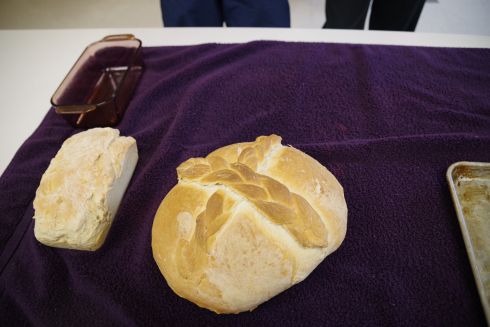
Loves of bread.

Nice and fluffy loaves of bread requires the generation of bubbles in the dough. This is typically done either with an acid-base reaction (baking soda and an acid) or with yeast. Since we’re doing biology, we made some loaves and focused on how the process of bread making require careful management of the environment for the yeast to produce the carbon dioxide gas that makes the bubbles that makes the bread rise.

We followed the bread-baking recipe I’ve used before for the middle school’s student-run business, but had to shorten rising times to get it all done by the end of our class.

Yeast is a single-celled fungi (typically Saccharomyces cerevisiae). Fungi are heterotrophs, so focusing on what the yeast requires for life and metabolic activity requires consideration of:

  • water (moisture)
  • warmth (but not too warm)
  • energy source (short chained carbohydrates to make the energy more easily accessible)

Yeast produces carbon dioxide bubbles via fermentation (Styurf et al., 2017). It could do it through respiration, but in the bread dough there is not a lot of oxygen available (more info on respiration here).

Fermentation looks something like:

C6H12O6 → 2 C2H5OH + 2 CO2

So, the carbohydrate (glucose) is converted to ethanol and carbon dioxide.

As opposed to respiration (which requires oxygen):

C6H12O6 + 6 O2 → 6 H2O + 6 CO2

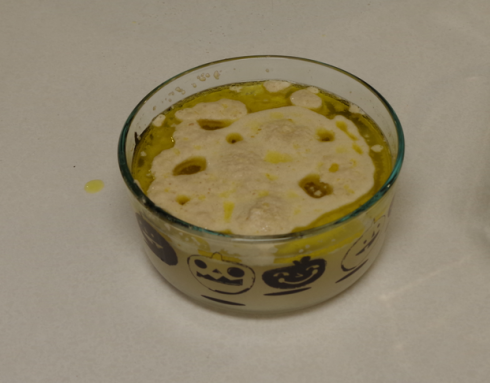
Yeast fermenting/proofing.

Extracting Gold from Computer Parts

An interesting demonstration of how gold can be extracted from printed circuit boards (PCB’s) and RAM trimmings (which I did not know was a thing). The yield is low, but NileRed gives full detail, including the chemical equations, which is why I may show this to my chemistry class.

LED Light Strip with Pi Zero

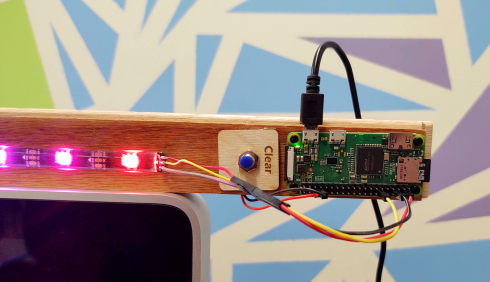
Raspberry Pi Zero controlling a LED strip, with a hardwired clear button.

I wanted to set up a small (20 LEDs) light strip using a Raspberry Pi Zero, so students could learn how to remotely log in to a device, work with the Linux command line, run python programs, and get visible, real feedback on their progress.

Instructions and code are in the Github rpi-led-strip repository.

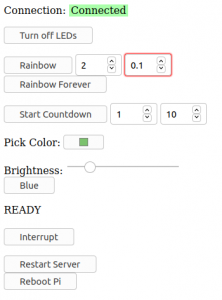
Web control for the LED strip.

The repository also has instructions and code for setting up a local server on the Pi so you can control the LED strip via a webpage. Students working on their own LED projects in the Makerspace will appreciate this.

The main idea here was to make the project as simple as possible. The web page is basic with minimal styling, so it should be easy to edit, but I do test out some of the newer HTML input elements, like the color picker. The README in the repository also includes instructions on how to, step by step, add components to the webpage to control the Pi: the “Blue” button is used as the example (it sets the entire strip to blue).

With only 20 LEDs you don’t need an external power supply so everything can be run through the Pi.

Adafruit’s CircuitPython NeoPixel library makes controlling the lights really easy. There are a few example programs in the rpi-led-strip/pyLED/ directory of the repository.

The full strip.

I’ve also included a physical button (it’s optional) that I’m using right now to just clear the LED strip. I may change it to just reboot the Pi, because I anticipate that things will get interesting when I have an entire class trying to connect to one or two devices. So far, I’ve had a small group of four students try this with some success.

3d Printable Microscopes

A few interesting, low-cost but potentially lab-grade, microscopes that would be great Makerspace projects for students.

OpenFlexure: Out of the University of Bath, this has a Raspberry Pi at the core that can control the stage, focus, and sensor (using the RPi camera module). Since it’s modular the cost varies with the image quality you’re aiming for, but it looks like you can achieve even high resolution results relatively cheaply. They have great detail on their website, including their own version of Raspbian to install on the Pi, so this looks like an good starter project.

UC2: I really like the look of this building block, LEGO-style, system. It seems extremely flexible and there are some interesting projects that go beyond your standard microscope. There are a lot of designs you can go with, including an Arduino or using a Raspberry Pi and camera, but they claim to get good results just with smartphones. This is a big, sprawling project, which suggests a slightly steeper learning curve.

Hat tip to Maggie Eisenberger for introducing me to these.

Playing with Electron Configurations

I upgraded the table part of the Electron Configuration Interactive I used in the app I made for Practicing Writing out Electron Configurations. It’s now more interactive and embeddable.

Click on the green cell (in the 3d subshell) to start adding electrons. Clicking on the previous cell will remove electrons.

The full documentation is here.

No Such Thing as Dark Matter

We’ve not been able to detect dark matter yet. Natalie Wolchover explains summarizes theories that could explain the way the universe works without having dark matter.

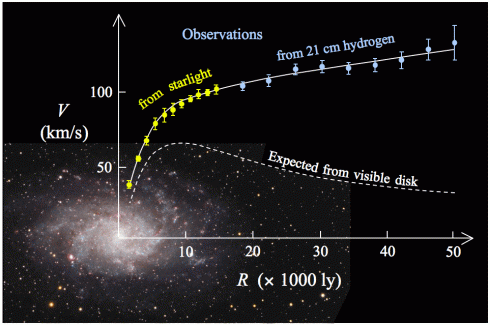
Key to it is the Modified Newtonian Dynamics (MOND) equation to explain why the stars at the outer edges of galaxies are moving faster than Newton’s force law predicts they should be.

Velocities of stars further away from the center of the galactic disk (larger R) have a higher velocity (V) than predicted by Newtonian physics. Dark matter has been used to explain this discrepancy, but tweaking the physics equations could do so as well. Image from Wikipedia.

Newton’s Second Law, finds that the Force (F) acting on an object is equal its mass (m) multiplied by its acceleration (a).

 F = m \cdot a

The MOND equation adjusts this by adding in another multiplication factor (μ)

 F = \mu \cdot m \cdot a

μ is just really close to 1 under “normal” everyday conditions, but gets bigger when accelerations are really, really small. Based on the evidence so far an equation for μ may be:

 \mu = \frac{a}{a_0} \frac{1}{\sqrt{1+\left(\frac{a}{a_0}\right)^2}}

where, a₀ is a really, really small acceleration.

Factoring this μ factor into the equation for the force due to gravity ( F_g ) changes it from:

 F_g = G \frac{ m_1 \cdot m_2}{r^2}

into:

 F_g = G \frac{(m_1 \cdot m_2)}{r^2} + \frac{\sqrt{G \cdot \m_1 \cdot m_2 \cdot a_0}}{r}

The key point is that in the first term, which is our standard version, the denominator is the radius squared (r^2) while the second term has a plain radius denominator (r).

This means as the distance between two objects gets larger, the first term decreases much faster and the second term becomes more important.

As a result, the gravitational pull between, say a star at the edge of a galaxy and the center of the galaxy, is not as small as the standard gravitational equation would predict it would be, and the stars a the edge of galaxies move faster than they would be predicted to be without the additional term.

References:

What is Dark Matter?

Adam Hadhazy, in Discover Magazine, summarizes the top candidates to explain dark matter and the experiments in progress to find them. These include, WIMPs (Weakly Interacting Massive Particles, Axions, Sterile Neutrinos, and SIMPs (Strongly Interacting Massive Particles.

Distortions in the shapes of galaxies caused by gravitational lensing. While gravitational lensing is caused by anything with gravity (this means normal matter as well) the lensing effect of dark matter is a key form of evidence for its presence. Image of the galaxy cluster Abell 2218 via Wikimedia Commons.

via Brian Resnick on Vox, who provides some very interesting historical context on the discovery of dark matter.