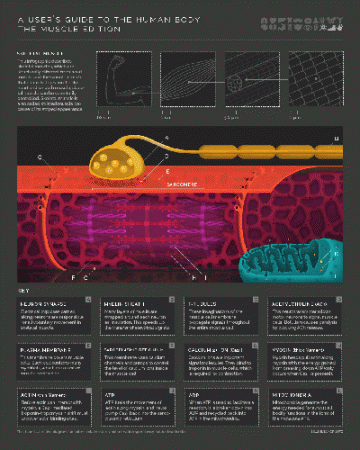
Awesome video by Kurzgesagt explaining “Why You Are Still Alive“.
Category: Natural World
Art, Science and Math
The Tabletop Whale blog by Elanor Lutz, has a focus on scientific illustration. It is a wonderful intersection of science, math and art, such as in this beautiful animation of a muscle in motion.
She has animations of butterflies and birds in motion as well.
Updated Atom Builder
A couple of my students asked for worksheets to practice drawing atoms and electron shells. I updated the Atom Builder app to make sure it works and to make the app embedable.
So now I can ask a student to draw 23Na+ then show the what they should get:
Worksheet
Draw diagrams of the following atoms, showing the number of neutrons, protons, and electrons in shells. See the example above.
I guess the next step is to adapt the app so you can hide the element symbol so student have to figure what element based on the diagram.
Datalogging with the Arduino
I wired a temperature sensor to my Arduino as part of the third project in the Arduino Projects Book. The project has the Arduino send the data to the serial port where the Arduino program (IDE) can show it. This data would be most useful to me, however, if it could be logged in a plain text file for data analysis. However, it’s a little annoying that there isn’t an easy way to save the data output by the Arduino.
So, I needed to use the terminal program “cat” to look at what was coming across the serial port. First I had to look up which port the Arduino was connected to in the Tools menu of the Arduino IDE: since I’m on a Mac, running OSX, this turned out to be something like /dev/cu.usbmodem411. (I could have looked this up by listing the contents of the /dev/ directory and then looking for anything connected to the usbmodem). To see the data I used:
> cat /dev/cu.usbmodem411
To actually save the data I directed the output of the cat command to the file data-log.txt:
> cat /dev/cu.usbmodem411 > data-log.txt
The contents of the file looked like this:
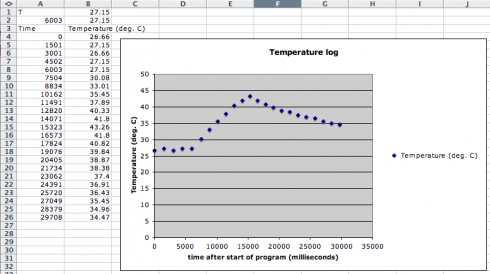
T25.68 6003,25.68 7504,25.68 Time (milliseconds), Temperature (deg. C) 0,25.20 1501,25.68 3002,25.68 4502,25.68 6003,26.66 7504,28.12 9006,30.08 10335,32.03 11663,33.98 12992,35.45 14321,36.91 15650,38.38 16979,39.84 18309,41.31 19559,42.77 20810,43.75 22062,42.77 23313,41.31 24563,40.82 25815,39.36 27144,38.87 28473,37.89 29802,37.40 31131,36.91 32459,35.94 33788,35.45 35118,35.45 36447,34.96 37776,34.47 39105,33.98 40434,33.98 41763,33.50 43091,33.01 44421,33.01 45750,33.01 47079,32.52 48408,32.52 49737,32.52 51066,32.03 52396,31.54 53724,31.54
I’m not sure what’s the deal with the first three lines, but if you ignore them you see the column headers (Time and Temperature) and then the time (in milliseconds) and temperature data) in a nice comma delimited format.
The Arduino program (sketch) that produced this output was:
const int T_sensor_Pin = A0; const float baselineTemp = 20.0; const int outPin = 4; void setup(){ Serial.begin(9600); pinMode(outPin, OUTPUT); Serial.println("Time (milliseconds), Temperature (deg. C) "); } void loop(){ int T_sensor_Val = analogRead(T_sensor_Pin); float T_sensor_Voltage = (T_sensor_Val * 5.0)/1024.0; float T = (T_sensor_Voltage - 0.5) * 100; float T_F = (T * 1.8) +32.0; Serial.print(millis()); Serial.print(","); Serial.println(T); delay(1500); }
Alternative Methods of Saving Data
Python
Python
Based on the same Arduino sketch, you can write a Python program to read the data. This method enables you to use the data directly with VPython for visualization.
First you need to install the pySerial library (pySerial). Then you can read the serial data using:
data-log.py
import serial ser = serial.Serial('/dev/cu.usbmodem411', 9600) while True: print ser.readline()
CoolTerm
You can also use CoolTerm to save the serial data (see directions on how).
An SD Card
Another alternative, is to get a shield that can hold an SD card (SparkFun and Adafruit have ones for less than $20) and write to that.
Sumac Berry Juice
Ripe, bright-purple sumac berries are quite astringent. Steep a ripe bunch in a quart or two of hot water for a few hours (or cold water for a day) and the result is a tart tea. Add a third of a cup of sugar to make a delicious juice. (Note: Poison sumac is not found in Missouri, but it has been identified in adjacent, eastern states, so be careful.)
3d Printing at School
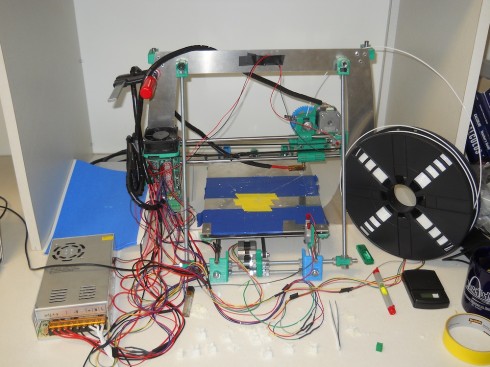
One of the key ideas behind the design of the RepRap 3D printer we just built is that you should be able to print as many of the components as possible. So you can use your 3D printer to build other 3D printers. As a consequence, the printer does not come as a nice little box. It looks a bit jury-rigged. Multicolored coils of wire snake everywhere; circuit boards and integrated chips are exposed; nuts, bolts and stainless steel rods are accessible for easy adjustment; and the plastic–printed–components are still rough from the printer. It is all function, no aesthetics. All of which make it a wonderful teaching tool.
The three students who built it got a crash course in robotic assembly. They learnt how to wire a power source, strip and solder wires, and construct the motor-controlled bed and extruder. They also learned how to use constructive solid geometry (using OpenSCAD) to create 3d shapes–I required them to design and print their own models before I would let them download object files from the internet.
On the down side, though they did have to plug a RAMPS motor shield, stepper-driver chips, and connecting wires into the Arduino microcontroller, we did not have much time to go into the detail of what it all was about. Also, we only edited an existing configuration file when we tried to calibrate the machine, so they did not learn how the programming works. Having to use the Arduino did inspire me to get one, and I was quite impressed with their starter kit, so I’m working on a “Microcontrollers for Beginners” type class or elective that I can offer over the next school year.
Arduino for Beginners
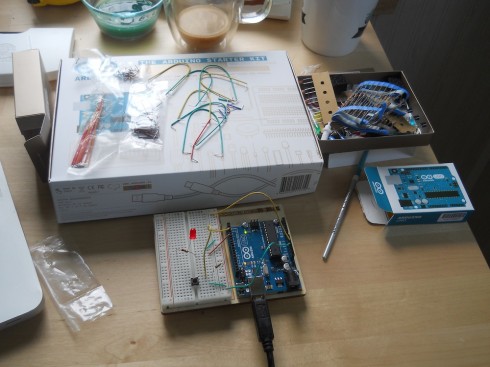
I’ve been avoiding working with the Arduino microcontrollers because I’d prefer to be able to program in Python with the Raspberry Pi (for example). However, since the 3d printer we just built this summer uses an Arduino for a brain, I broke down and picked up the Arduino Starter Kit (via Adafruit).
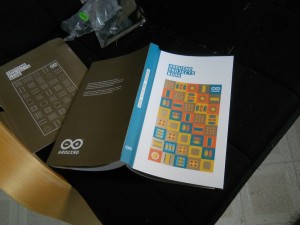
What I liked most about the Starter Kit most is the Arduino Projects Book that comes with it. It’s a wonderful introduction to circuits, electronics, circuit diagrams, and microcontrollers at the beginners level. If I offer an Arduino elective, I’ll use it as a textbook. Indeed, I’ll probably use bits of it as a reference when I teach circuits in middle school and Advanced Physics.
As for the programming, the basics, at least, are pretty straightforward. I got a blinking LED controlled by a switch input up an running pretty quickly. The code requires two loops, one to set up the inputs and the output, and a loop for the program to follow. The code below has a blinking light that’s controlled via pin 4, but changes to a solid light when the switch is pressed (the input for the switch is pin 2). The wiring for the circuit is shown in the picture at the top of the page.
blink_circuit
int switchOn = 0; void setup(){ pinMode(2, INPUT); pinMode(4, OUTPUT); } void loop(){ switchOn = digitalRead(2); if (switchOn == HIGH) { digitalWrite(4, HIGH); } else { digitalWrite(4, LOW); delay(500); digitalWrite(4, HIGH); delay(200); } }
The Final Product
So I made the guitar. The guitarbuilding group make it hard to make a bad guitar, with the beautiful materials they provide, and their expert instruction, however, I’m inordinately proud of myself as well.
Indeed, as more and more of the elements fell into place over the course of the week, it really brought home the affective power of a) building something with your own hands, and b) the iconography of the electric guitar.
Now I have to figure out the logistics of doing this at Fulton. But as the workshop instructors pointed out, even if you don’t have students build one, just bringing the electric guitar into the classroom and saying, “Today we’re going to study sound,” really catches the attention.